
If you're searching for sod installation near me, there's a good chance your yard has already put you through the usual cycle. You seed bare spots. A hard rain hits. Mud washes downhill, weeds come back, and the dog tracks half the yard onto the porch. In West Tennessee, that pattern is common because our soil often holds water too long in one place and dries hard in another.
That's why sod appeals to so many homeowners around Jackson. It changes the look of a yard fast, but its primary benefit isn't just green grass in a day. Its lasting advantage is getting the ground underneath that grass right so the lawn still looks good after the first stretch of rain, heat, and foot traffic.
A good sod job isn't a surface fix. It's grading, drainage, soil prep, tight seams, and a watering plan that matches the season. If any one of those gets skipped, the lawn can struggle before it ever has a chance to root.
From Muddy Mess to Manicured Lawn in a Day
A lot of yards in West Tennessee don't look bad because the homeowner ignored them. They look bad because the site fights back. You can rake, seed, fertilize, and patch all spring, then one storm leaves the yard slick, rutted, and thin again.
That's the usual story with heavy clay soil. Water doesn't move the way people expect. One corner stays soggy. Another bakes hard. Grass comes in uneven, and the bare areas turn into mud every time the weather shifts. If that sounds familiar, it's worth looking at the drainage side before anything else. This guide on how to fix a muddy yard is a good starting point if the underlying issue is water, not grass seed.
Sod changes that situation quickly, but only when the prep work is handled like a real installation, not a cosmetic cover-up. Laid correctly, sod gives you an instant lawn surface instead of waiting through a long seeding cycle and hoping weather cooperates.
Practical rule: If a yard stays muddy now, fresh sod alone won't solve it. The grade and water flow have to be corrected first.
The neighbors who end up happiest with sod are usually the ones who stopped chasing spot fixes. They quit buying one more bag of seed for a yard that needs reshaping, cleanup, and a fresh start. Once the soil is graded, the drainage is addressed, and the sod is rolled in tight, the yard can go from patchy and sloppy to clean and finished in a very short window.
That's the appeal. Not magic. Just the right process done in the right order.
The Sod Installation Process from Start to Finish
A professional sod installation has a rhythm to it. Crews who know what they're doing don't start by throwing grass on the ground. They start by reading the yard, because the shape of the soil decides whether the sod lives or struggles.
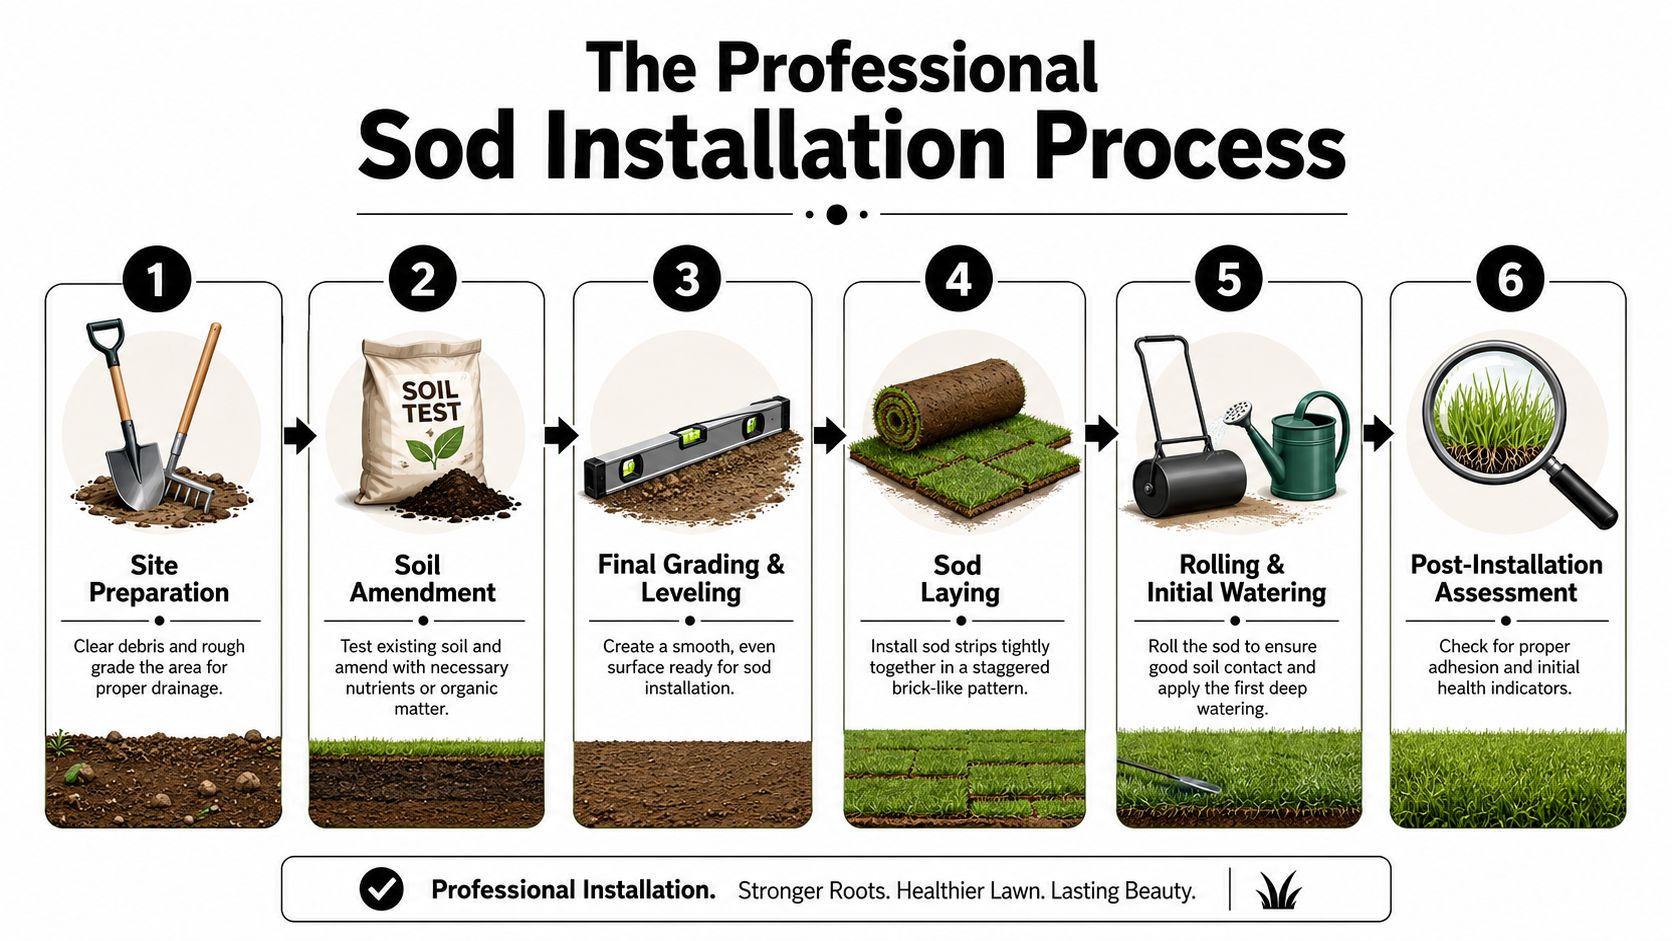
Start with removal and cleanup
The first step is stripping the area down to where the new lawn has a real chance to root. Old turf, weeds, loose rock, construction debris, and leftover roots all need to come out. One Tennessee sod guide notes that soil prep should include removing 100% of existing debris and rocks before installation, and that sod should be installed within 24 hours of cutting so it doesn't dry out before rooting begins, as explained in this Tennessee sod installation guide.
In West Tennessee, cleanup matters even more on newer lots. It's common to find compacted subsoil, buried gravel, or chunks of brick and concrete just below the surface. If you lay sod over that mess, roots hit a wall early.
Grade before you think about grass
Many DIY sod installations falter due to improper preparation. The yard has to be shaped so water leaves the house and doesn't settle under the new lawn. Expert installation guidance calls for a 1% to 2% slope away from the home and for soil to be graded 1 inch below paved surfaces like driveways and walks, according to this sod installation methodology reference.
That slight slope sounds minor, but it's one of the biggest details in the whole project. Too flat, and water sits. Too aggressive, and water runs off too fast and can wash out lighter areas.
A solid prep sequence usually looks like this:
- Strip the site clean: Remove vegetation, roots, stone, and leftover debris.
- Break up compaction: Loosen the upper layer so roots can move into soil instead of sitting on top of it.
- Correct the grade: Build the surface so it sheds water away from the house.
- Fine-rake the finish: Knock down ridges and fill shallow depressions.
- Set edges properly: Keep soil slightly low against hardscape so the finished sod sits neatly.
For a more detailed walkthrough, this page on the step-by-step process of professional lawn sod installation lines up with how a careful crew approaches the work.
Work with clay soil instead of pretending it's loam
West Tennessee clay can hold nutrients well, but it also compacts hard and drains unevenly. That means the base has to be workable before sod goes down. If the soil is slick and sticky, it needs time or amendment work. If it's hard as brick, it needs loosening and blending so roots can enter.
A smooth yard isn't always a ready yard. The surface can look level and still be too tight for roots.
This is also where local experience matters. A crew used to sandy soil may leave a West Tennessee lawn too sealed over. On clay, the goal is firm but not packed solid.
Lay sod in a pattern that prevents future seams
Once the soil is ready, installation starts along the longest straight edge. Rows should be laid in a running bond pattern, with seams offset by about 50%, based on the same installation standards for laying sod. That brick-like pattern helps prevent long visible joints and weak seam lines.
There are a few non-negotiables here:
- Keep edges tight: Butt pieces firmly together so gaps don't open as the sod settles.
- Don't stretch the rolls: Pulled sod shrinks back and exposes seams.
- Press every piece flat: Air pockets dry roots out fast.
- Cut clean around curves: Jagged trimming leaves weak edges that dry first.
Finish with rolling and immediate watering
After the sod is down, it needs contact with the soil underneath. A lawn roller helps press the root layer into the prepared grade so there aren't hollow spots underneath. Then watering needs to start fast. Professional standards call for watering within 30 minutes of installation and keeping soil moisture down to a 3 to 4 inch depth during early establishment, as described in this technical sod installation guide.
That first watering isn't a rinse. It's the handoff from installation to establishment. If that transition is sloppy, the whole job starts behind.
Understanding Sod Costs and Timelines in West Tennessee
Most homeowners ask two practical questions first. What's this going to cost, and how long is my yard going to be torn up?
The cost side is easier to estimate than the timeline side, because weather and site conditions can change the pace of work. Still, Tennessee pricing gives a useful frame. Professional sod installation in Tennessee averages $1.13 to $1.31 per square foot, with a median of about $1.22 per square foot, and a standard 5,000-square-foot yard typically falls between $6,250 and $10,750 depending on grass variety and site conditions, according to Tennessee sod installation cost data.
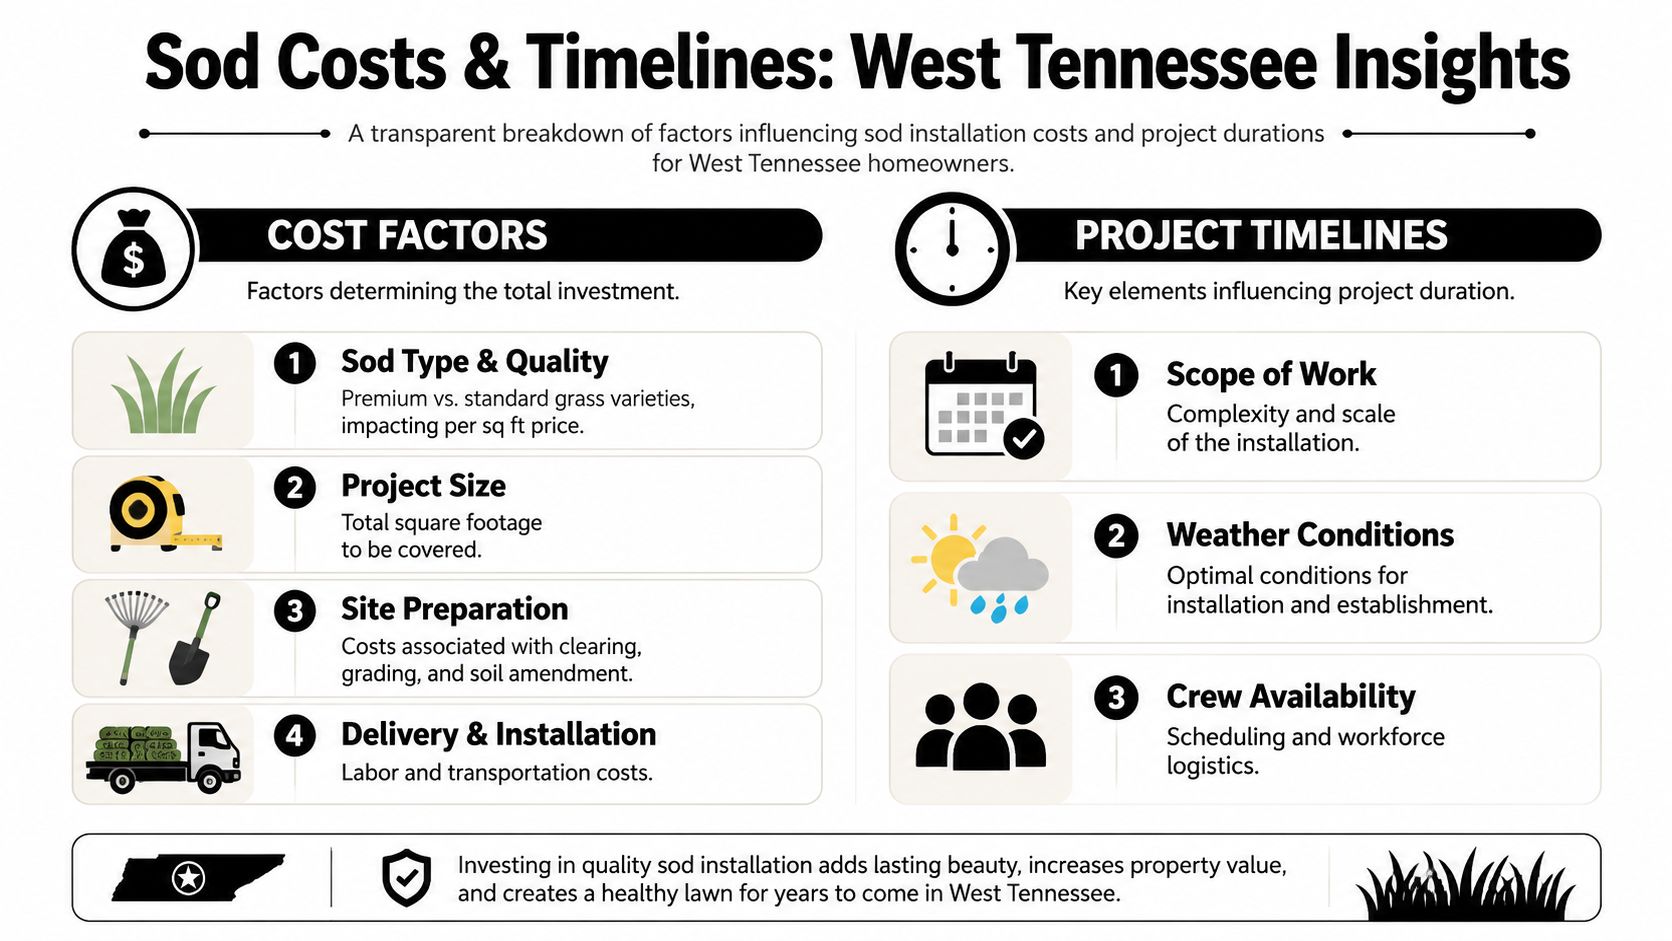
What moves the price up or down
The square-foot number is only the starting point. Final pricing usually changes based on what the site asks for.
Here's what tends to matter most:
| Cost factor | Why it affects the job |
|---|---|
| Yard size | Larger areas need more material, more labor, and more delivery handling. |
| Grass type | Some sod varieties cost more than others. |
| Site prep | A clean, level lot is cheaper to prep than one with weeds, ruts, buried debris, or drainage trouble. |
| Access | Tight gates, fenced backyards, and awkward hauling paths slow installation. |
| Slope | Difficult sites can increase cost because crews spend more time on hand work and stabilization. |
The same Tennessee cost reference notes that steep slopes or hard access can raise figures by up to 20% because of extra manual labor, and that Nashville installer wages run $22 to $30 per hour while rural West Tennessee areas such as the Appalachians are typically $20 to $24 per hour for experienced installers, all from the same state pricing source.
What the timeline usually looks like
A sod project rarely begins on installation day. First comes the estimate, then scheduling, then material coordination, then site prep. The actual laying of the sod is often the fastest part.
A normal flow looks like this:
- Initial visit: The yard gets measured, inspected, and checked for drainage or access issues.
- Preparation window: Existing turf gets removed, rough areas are corrected, and the grade is shaped.
- Installation day: Sod is delivered fresh and laid as soon as the site is ready.
- Early care period: Watering begins immediately and continues on a strict schedule.
The best timing for installation in Tennessee is often fall. Historical guidance points to September and October as the strongest window because cooler weather reduces moisture stress and gives roots time to establish before the first hard freeze, as noted in this guide on the best time to lay sod in Tennessee.
If you have flexibility, plan the project around weather and soil condition, not just your weekend calendar.
That said, waiting for a perfect month isn't always necessary. What matters is whether the crew can prep the site correctly, get fresh sod down promptly, and give you a realistic watering plan based on current conditions.
Beyond the Basics Drainage and Erosion Control
In West Tennessee, drainage isn't an add-on after the lawn is installed. It's part of the lawn installation itself. If the yard holds water now, new sod will sit in that same water unless the grade and runoff path are corrected first.
That's why so much generic online advice misses the mark for local homeowners. It treats drainage like something you solve later if the lawn struggles. By then, the sod may already be declining.
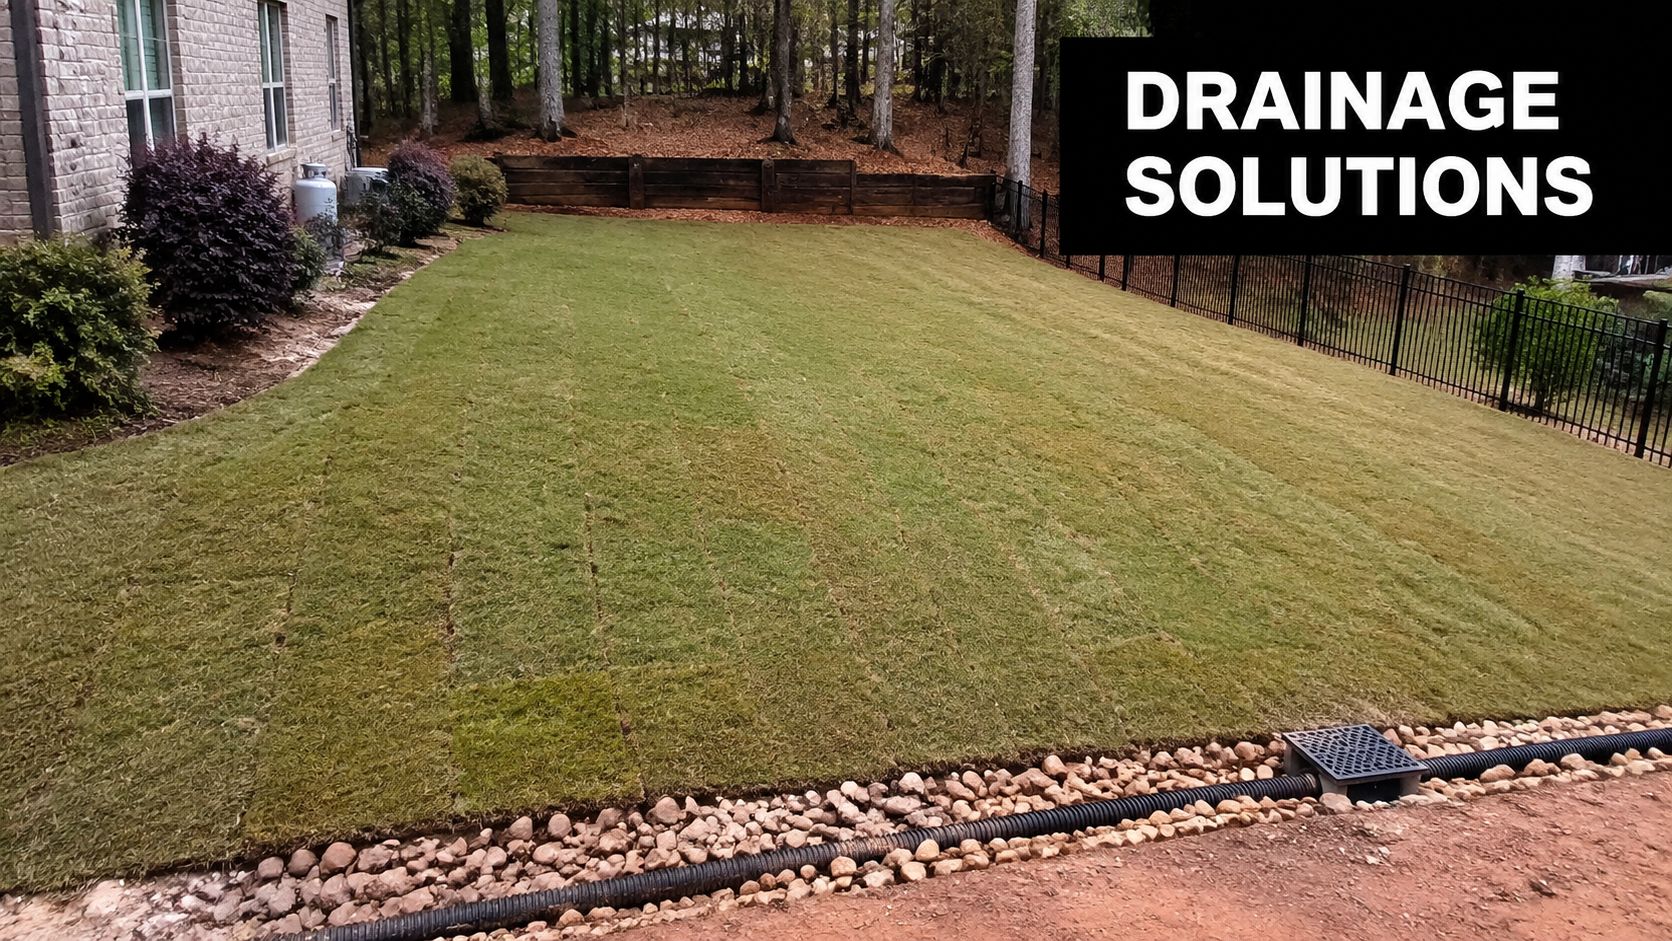
Standing water is a sod killer
Purdue Extension states that sites should be smooth and firm with no areas where standing water collects before installation begins, and the source behind that guidance also highlights a major content gap in local service pages that downplay this pre-installation step. You can see that point in Purdue's turfgrass establishment guidance on site preparation.
That lines up with what happens in real yards. On clay-heavy sites, water doesn't disappear quickly on its own. It ponds, softens the base, and weakens root development. In problem spots, sod can fail fast because roots need both moisture and oxygen. A saturated base cuts off that balance.
Drainage fixes that belong in the same conversation
For some yards, regrading is enough. For others, water needs a defined path out of the area. That can mean swales, French drains, catch basins, channel drains, or erosion control on sloped sections.
The right fix depends on where the water starts and where it can safely go.
A drainage-focused sod plan often includes:
- Reworking low spots: Small dips become puddles after every rain and need to be filled or reshaped.
- Protecting slopes: Water running downhill can pull at seams and wash exposed soil before roots lock in.
- Collecting roof runoff: Concentrated discharge from downspouts often ruins the same lawn section repeatedly.
- Moving water away from structures: Lawn work should also protect the house, patio, and walkways.
If your yard has a grade issue or a washout area, this guide on how to prevent soil erosion on slopes is worth reading before sod goes down.
Don't judge a sod job only by how green it looks on day one. Judge it after the first hard rain.
Why local experience matters here
This is one area where a local installer can save a homeowner from repeating the same failed project. Someone familiar with West Tennessee clay and storm patterns will look at flow lines, not just square footage. They'll notice where mud tracks start, where roof water lands, where mower ruts hold water, and where the back corner never dries out.
That's also where a company like Lawn & Leaf Solutions fits naturally into the process. The company handles both sod work and drainage-related services, which matters on properties where the lawn problem is really a water-management problem wearing a grass disguise.
Your New Lawn's First Month A Critical Maintenance Schedule
Fresh sod can look finished the minute it's installed, but the first month decides whether it becomes a lawn or just temporary green carpet. The roots have to move from the sod layer into the soil below. That only happens when moisture is steady, the ground isn't drowned, and traffic stays light.
The visual checklist below gives the broad rhythm of aftercare.
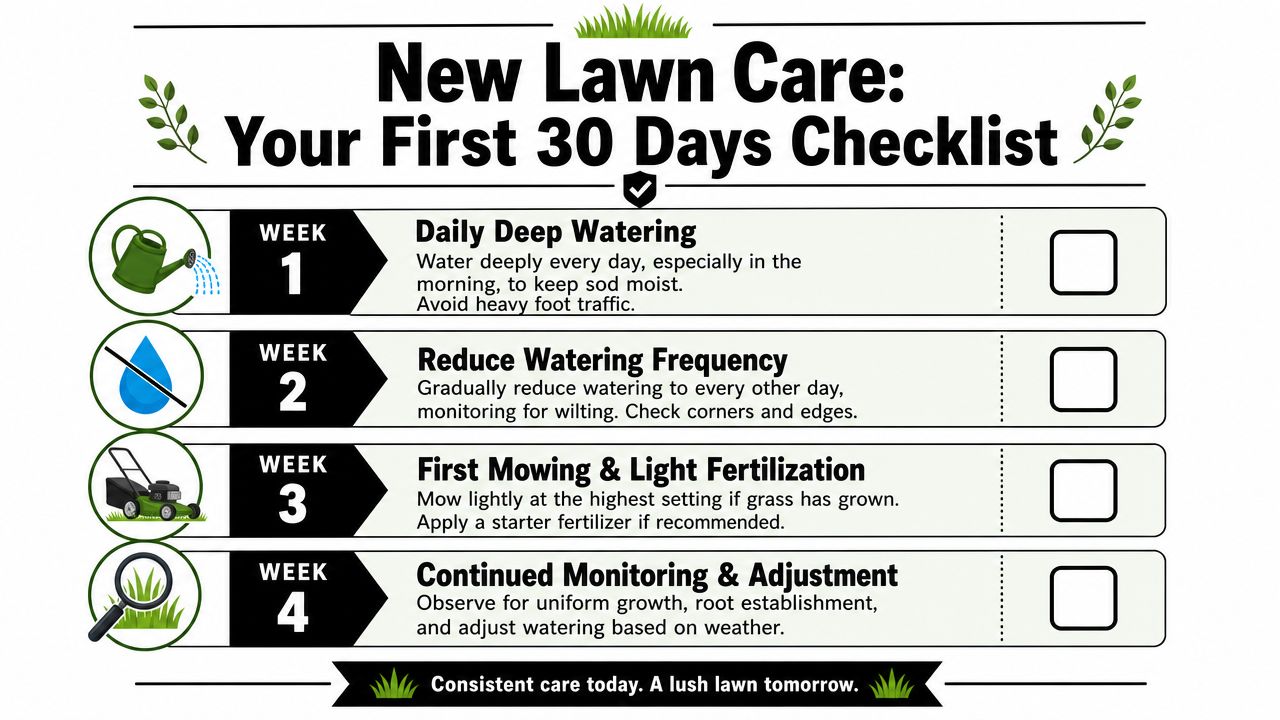
Week one and two
In summer conditions, new sod needs watering twice daily for the first 14 days to keep it from drying out, according to this Tennessee-based guide on what to expect after a new sod installation. Another installation reference notes that watering is best done early morning and late afternoon or early evening, while avoiding midday evaporation and late-evening disease pressure, and that white roots are often visible within 2 to 3 weeks when moisture stays balanced, according to this watering and rooting overview.
That doesn't mean blasting the lawn until it turns muddy. The goal is moisture, not saturation.
Use this rule of thumb during the opening stretch:
- Morning watering: Soak enough to keep the sod and topsoil moist.
- Second watering: Check edges, corners, and sunny spots first because they dry faster.
- Foot traffic: Keep kids, pets, and repeated walking off the lawn as much as possible.
- Daily inspection: Lift a corner carefully in one area only if you need to check whether the soil underneath is staying moist.
New sod should feel soft underfoot, not squishy and not crisp.
If you're watering from a hose instead of a built-in irrigation system, consistency becomes the hard part. Homeowners dealing with long dry spells sometimes look into residential water storage solutions so they're not caught short during establishment, especially when outdoor water demand spikes.
Week three and four
By this point, the lawn should begin holding more evenly. You're still watching moisture, but you're also paying attention to rooting and top growth.
Mississippi State guidance summarized in the verified material stresses that the biggest watering mistake is “drowning” the lawn. Too much water turns the soil muddy, limits oxygen to roots, and can lead to rot. The better approach is light, frequent watering that keeps the base moist without making it ooze.
A simple week-by-week shift looks like this:
| Period | Main focus |
|---|---|
| Week 3 | Check rooting, reduce watering gradually if the sod is holding moisture well |
| Week 4 | Adjust to weather, continue monitoring edges and sunny areas, begin moving toward normal lawn care |
The first mowing should wait until the turf has anchored enough that it doesn't shift under your feet. When you do mow, use a sharp blade and avoid turning the mower hard on tender seams.
Fertilizer and common mistakes
Fertilizer choices matter, but so does local regulation. Older lawn advice often pushes high-phosphorus starter products automatically. Current guidance in the verified material notes a growing issue around phosphorus-restricted starter fertilizers in regulated markets, so don't assume every bag on a shelf is the right answer for your site.
The common mistakes are more predictable than the fertilizer question:
- Overwatering low spots: These areas stay wet longer than the rest of the yard.
- Ignoring edges: Sod dries faster at borders, curves, and pavement lines.
- Mowing too soon: That can shift pieces before roots knit in.
- Walking the same path daily: Repeated steps can depress seams and corners.
Choosing Your West Tennessee Sod Installer
When homeowners compare DIY with hiring a pro, the difference isn't just labor. It's risk. A DIY job can work on a small, simple area, but the margin for error gets thin fast once the yard has slope, drainage issues, poor access, or clay that needs thoughtful prep.
The watering phase alone is where many projects go sideways. Verified guidance on early establishment says the lawn should stay soft underfoot but not oozing wet during the first week, with white roots often visible in 2 to 3 weeks if moisture stays right, and it identifies “drowning” the lawn as the most damaging pitfall in early care, based on this research summary on new sod irrigation.
What to ask before you hire anyone
A solid local installer should be willing to answer direct questions without dodging. Ask for specifics, not broad promises.
Use this quick checklist:
- License and insurance: Ask for proof, not verbal reassurance.
- Local experience: West Tennessee yards behave differently than lighter soils in other regions.
- Drainage awareness: If they only talk about grass type and never mention grade, keep looking.
- Detailed estimate: You want line-of-sight into prep, delivery, installation, and any drainage-related work.
- References or project photos: Look for yards similar to yours, especially if you have slope or water trouble.
If you're trying to sort serious local companies from whoever ranks first online, this resource on local SEO for service industry companies helps explain why visibility and actual field capability aren't always the same thing.
Why professional installation usually wins
Here's the plain comparison.
| DIY sod project | Professional sod project |
|---|---|
| You handle measuring, ordering, hauling, prep, grading, cutting, watering, and troubleshooting | The crew handles site prep, fit, sequence, and installation details |
| Easier to miss drainage flaws until after the lawn is down | Drainage concerns are more likely to be caught before installation |
| Fine for small, simple spaces if you're prepared for the labor | Better fit for larger yards, clay-heavy sites, slopes, and access challenges |
For homeowners in Jackson and surrounding areas, the strongest choice is usually the installer who can evaluate both turf and drainage in the same visit, provides a clear estimate, carries proper credentials, and has enough local experience to spot trouble before the sod truck arrives. Lawn & Leaf Solutions meets that standard with over 18 years of hands-on experience and License # TNPL23317.
Quick questions homeowners still ask
Can sod be installed if my yard stays wet after rain
It can, but the wetness has to be addressed first. If water stands in place, the site needs grading or drainage correction before installation.
Is fall really better than summer
Often, yes. Cooler conditions are easier on fresh sod, and roots generally establish with less stress than they do in peak heat.
Will new sod fix an uneven yard by itself
No. Sod follows the grade underneath it. If the yard is lumpy, low, or poorly shaped, the finished lawn will reflect that.
If your yard is stuck in the cycle of mud, patchy grass, and drainage headaches, the next step is to get the site evaluated before more money goes into seed or temporary fixes. Lawn & Leaf Solutions serves Jackson and West Tennessee with sod installation, drainage correction, erosion control, and lawn services built around how local yards behave. Reach out for a free estimate and get a plan that addresses the ground first, then the grass.