
You step out the back door, and the new sod looks perfect for about ten seconds. Then you notice one corner riding up, a soft spot near the downspout, and a pale seam that's already starting to dry at the edge. In West Tennessee, that's a normal first-day panic, especially when a yard gets hit with heat, wind, or a surprise shower right after installation.
The first month is less about “making it look finished” and more about keeping the root zone alive long enough to knit into the soil. That means watching water, traffic, mowing height, and drainage as separate decisions, not one generic checklist. A good sod job can still fail if the site holds water, dries too fast, or gets walked on too early.
Homeowners usually want one simple answer, but new sod cares about timing. The first week is about moisture control, the second week is about easing off without letting seams dry, and the third week is when rooting starts to tell you whether the lawn is ready to behave like turf instead of a rolled transplant. For a local walkthrough of what to expect after installation, this new sod overview from Lawn & Leaf Solutions fits the reality most Jackson yards face.
Introduction to New Sod Care
Fresh sod doesn't need heroics, it needs consistency. The mistake I see most often is treating day one like a normal lawn, then reacting after the corners crisp up or the middle gets spongy. The safer approach is to assume the turf is fragile until the roots tell you otherwise.
In practice, that means thinking in milestones. The first milestone is immediate watering after install, then keeping the top soil profile moist through the establishment window. Another milestone arrives when the sod resists a light tug at the corners, which is a much better sign of progress than guessing by color alone.
Practical rule: if you're choosing between “a little too dry” and “a little too wet,” dry is usually the faster way to lose new sod in our climate.
West Tennessee makes that balancing act harder. Spring rains can mask a bad grading problem, and summer heat can punish even a small lapse in irrigation. Generic advice often skips that local context, but yards around Jackson live or die by how they handle water movement, soil compaction, and hot afternoons.
Establishing Your Watering Routine
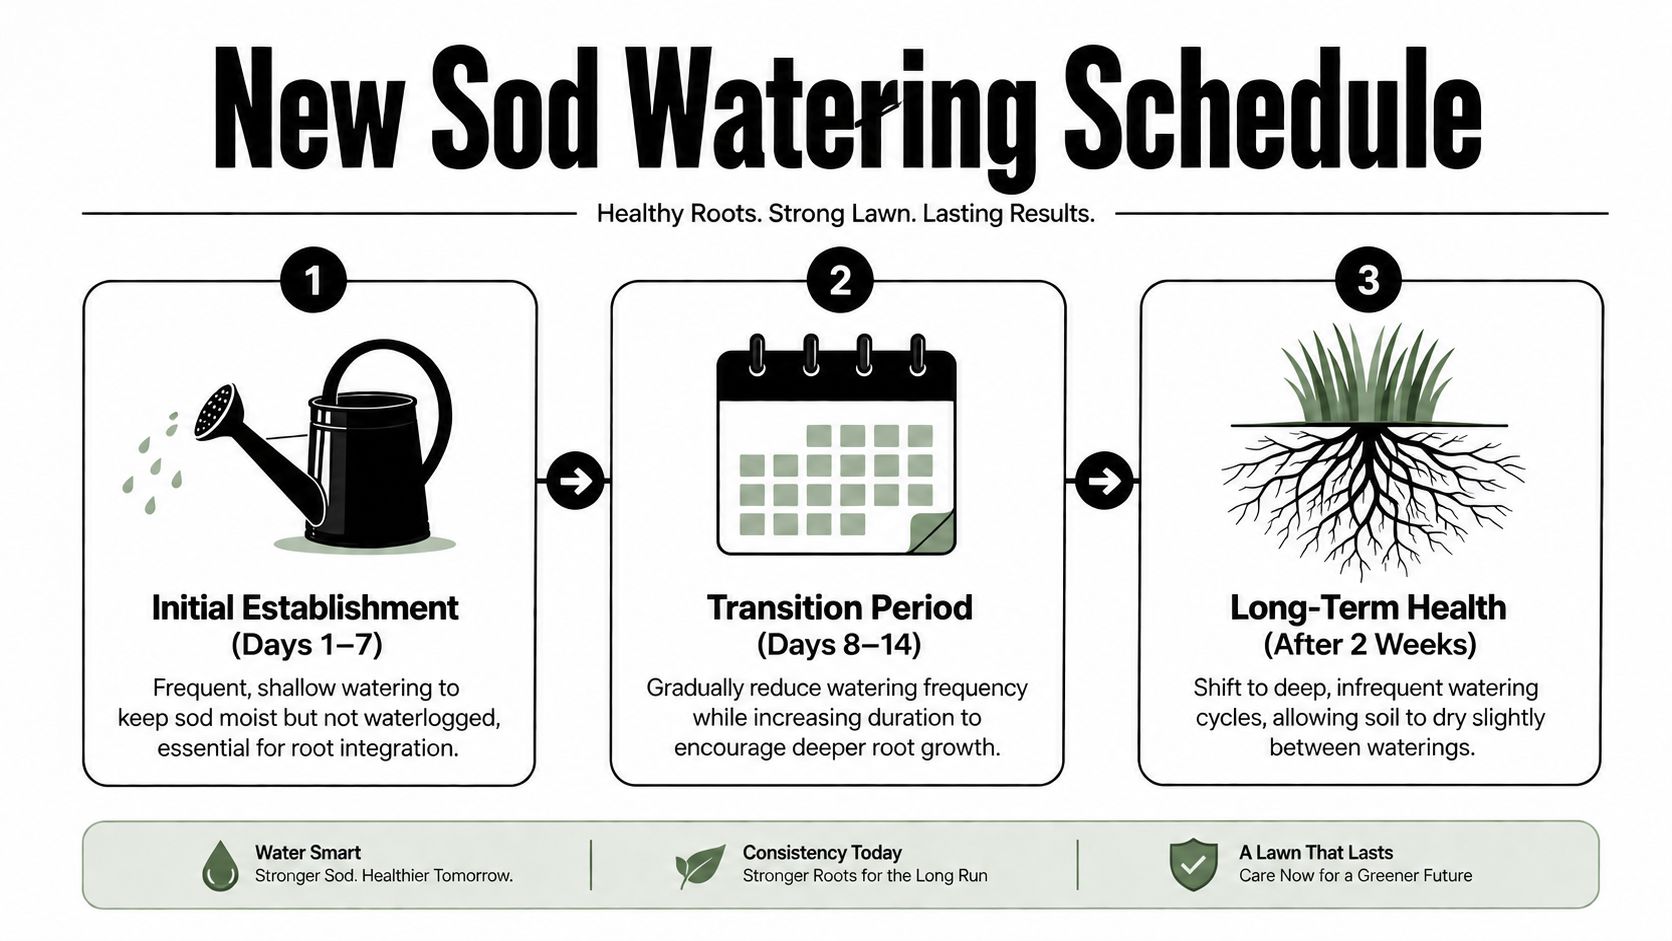
Start with water immediately after installation, then keep the top soil profile evenly moist through the first 1 to 2 weeks. A practical range is 2 to 4 watering cycles per day, with sessions of about 10 to 15 minutes per zone (new sod care guide). That is the baseline I trust before I trust a weather app, because West Tennessee heat, wind, and patchy shade can shift a lawn faster than a forecast suggests.
A practical day-by-day rhythm
For the first 7 days, use short, frequent cycles. New sod needs moisture at the surface and into the root zone, not a soaked yard that stays soft too long. One industry guide notes that early cycles often need around 20 minutes to create a meaningful soak, and the edges usually dry first, so hand-watering perimeter strips can prevent a lot of trouble (sod establishment guide).
Days 8 through 14 are for easing off without stressing the turf. Reduce frequency a little if the seams stay dark and the soil underneath still feels evenly damp, but do not cut back sharply just because the top looks green. After about 14 days, many guides move toward about 1 to 1.5 inches of water per week total, including rainfall.
After that, the goal shifts to less frequent but deeper watering. Let the lawn dry slightly between cycles once the roots start knitting into the soil. If you are unsure whether your sprinkler output matches the schedule, use small containers in a few zones and compare how fast they fill, then adjust runtime instead of guessing. If your home needs a different setup to hit those zones evenly, this guide to choosing a sprinkler system is a useful check before the next hot spell.
What changes the schedule in real yards
Soil type, slope, and sun exposure matter as much as the clock. A sandy patch near a driveway dries faster than a shaded side yard, and a slope can shed water before it soaks in. If a low spot puddles while the uphill strip dries out, do not just add more time everywhere.
West Tennessee yards make that unevenness obvious. Clay-heavy soil can hold water on the surface while the edges dry out, and newly graded areas around Jackson often reveal drainage problems only after the first few watering runs. I have seen plenty of lawns that looked fine in the middle while the perimeter cooked in afternoon sun.
Field note: new sod usually fails at the edges first, because those strips heat up and dry faster than the center.
If your sprinkler layout is weak or uneven, fix it now instead of spending the whole month rescuing dry seams. A good system should wet the turf evenly enough that you are not hand-saving the same corners every afternoon, and the right nozzle pattern or zone adjustment can make more difference than adding extra runtime.
Mowing and Fertilizing New Sod
Mowing too early does more harm than most homeowners expect. Several guides use the one-third rule, meaning you shouldn't remove more than one-third of the leaf blade in one cut, and the first mow should wait until the grass reaches about 3 to 4 inches tall (mowing benchmark). That gives the sod enough leaf area to keep feeding roots while it settles in.
How to handle the first cut
Set the mower high. A common installation benchmark is to mow when the turf reaches about 3.5 to 4 inches and cut it back to roughly 2.5 to 3 inches, keeping the cut conservative to reduce transplant stress (new sod timeline). If you take off too much, the turf spends energy recovering instead of rooting.
Use sharp blades and avoid tight turns on fresh sod. Heavy pivots can scuff the surface, especially if the soil is still soft from watering. If the lawn is uneven, don't force a low cut to make it “look finished,” because that usually exposes seams and weak spots.
Fertilizer timing without overdoing it
New sod already comes with a lot of stress on the root system, so fertilizer timing should be conservative. I like to wait until the turf is visibly anchoring before adding anything that pushes top growth too hard. If you fertilize too early, you can get lush blades on weak roots, which is the opposite of what you want.
For ongoing feeding decisions, this fertilization guide is a useful reference once the lawn starts acting established. The key is to feed for root support, not for a fast visual fix.
Don't use fertilizer as a substitute for rooting. If the sod lifts easily, the lawn needs time, not more nitrogen.
Managing Foot Traffic and Turf Protection
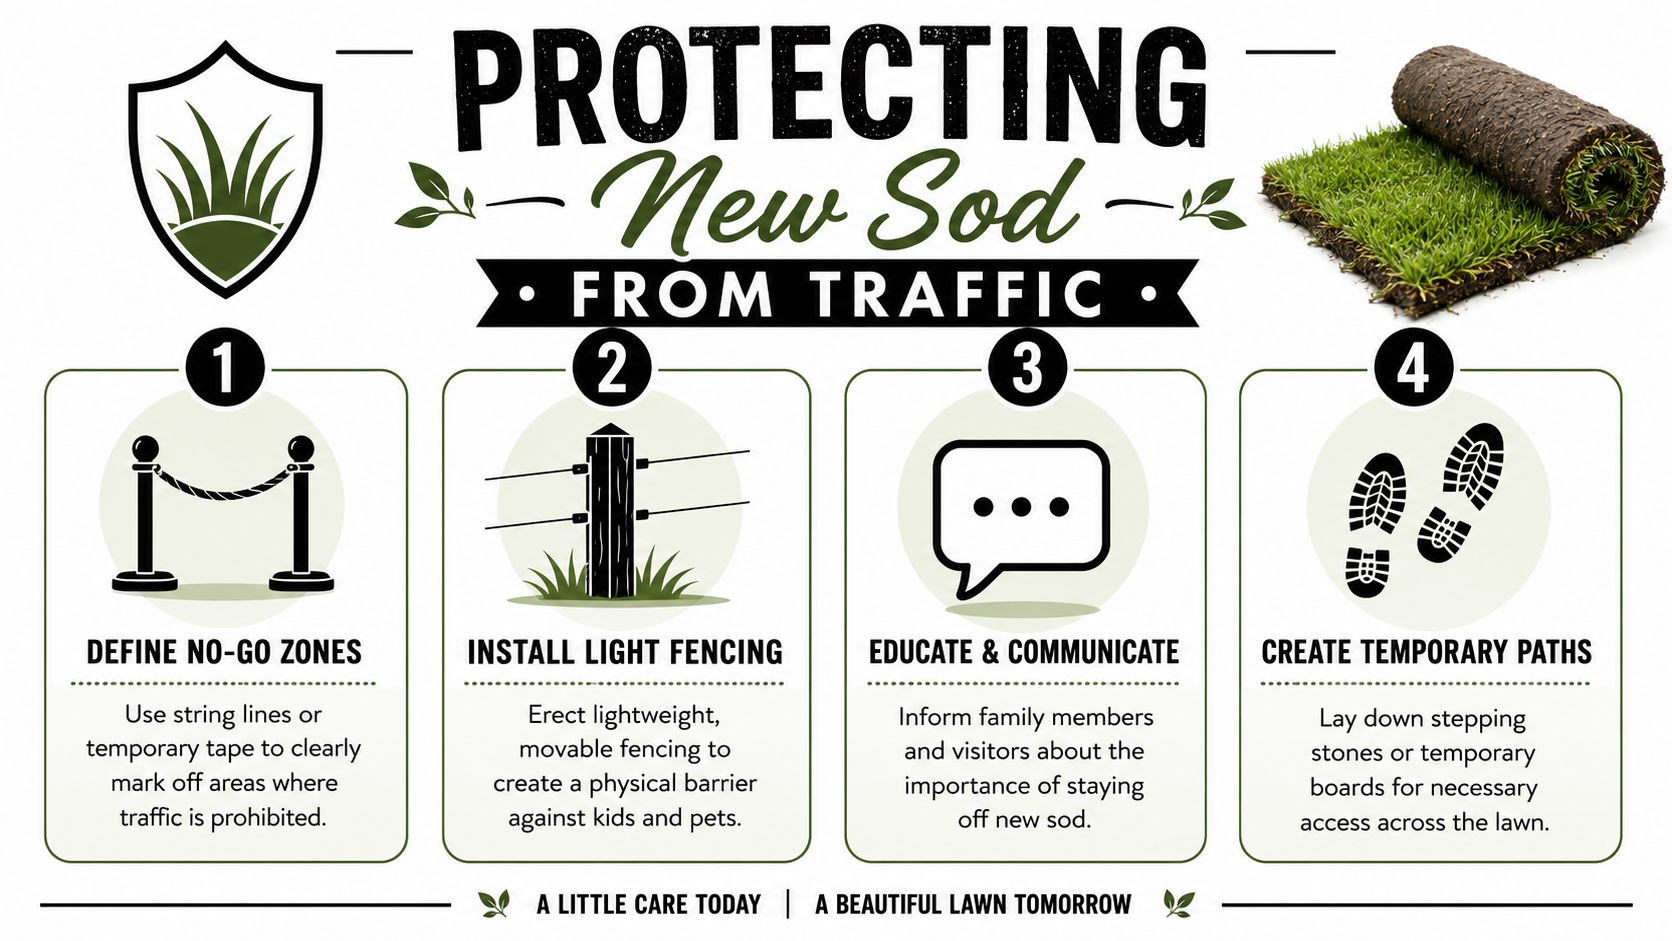
New sod can't take pressure the way established turf can. Each step compresses the root zone, and if the grass is still trying to anchor, that pressure can tear roots instead of helping them knit. The safest move is to treat the lawn like a work site until it passes the tug test.
Keep the lawn off-limits, then make that obvious
Mark no-go zones with string line, temporary tape, or lightweight fencing. That sounds fussy until kids, guests, and dogs all decide the new grass is the best path across the yard. If you need a simple visual reminder for the household, a short sign or a rope barrier works better than repeating yourself all week.
For pet-heavy yards, it helps to keep a cleanup plan and deterrent strategy ready, especially if the lawn borders beds or mulch areas. A practical resource such as natural outdoor pest control can fit into that broader yard-care conversation when you're trying to keep the space usable without turning the whole yard into a free-for-all.
Use the tug test before opening access
Around three weeks is a useful checkpoint if rooting has gone well. By then, a light tug at the corner should meet resistance rather than lifting like a loose rug. If the sod still slides up easily, keep traffic restricted and give the roots more time.
Temporary paths help when you still need access for trash bins, hoses, or maintenance. Stepping stones or a narrow board walkway protect the same route from becoming a muddy trench. In busy family yards, this is often the difference between a lawn that roots evenly and one that gets rutted in the middle.
Monitoring Irrigation Drainage and Troubleshooting
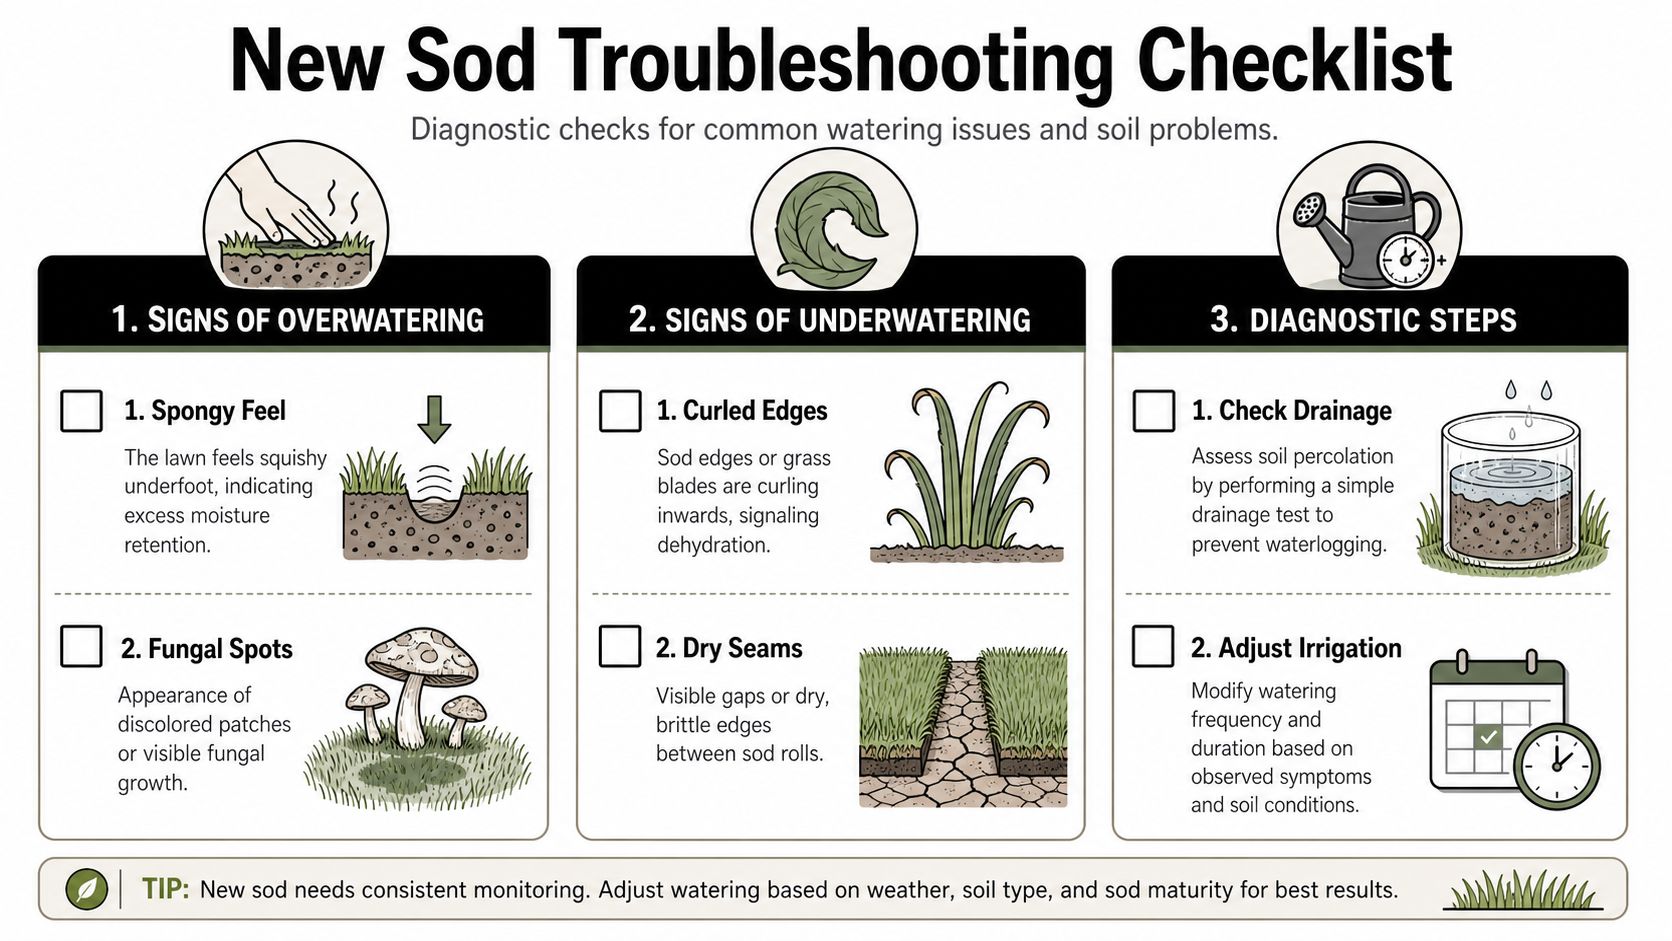
Watering schedules only work if the site can drain. In poorly drained yards, extra irrigation can keep the root zone saturated and shallow, which slows rooting instead of helping it (drainage warning). That's why I look at turf symptoms and soil behavior together, not just the clock.
Read the lawn before you change the schedule
A spongy feel usually points toward too much water or poor drainage, especially if the yard stays soft well after watering. Curled blades, dry seams, and brittle edges point the other way, toward water stress or uneven coverage. The fastest mistake is assuming every dry-looking patch needs the same response.
You can also check whether the issue is the sod or the base underneath. If water hangs around after rain, the problem may be grading, compaction, or a low spot that needs correction instead of another irrigation adjustment. That's the part most generic guides skip, even though it's often the primary reason the lawn fails.
What to do when the ground is the problem
If a spot stays wet, stop trying to solve it by watering more. In some yards, a simple drain test or a shallow correction to the grade is enough to improve how the soil sheds water. In others, especially where runoff keeps returning, a drainage repair is the definitive fix.
That's where professional help earns its keep. The earlier you address pooling, the less likely you are to end up with shallow rooting and repeated re-sodding. For homeowners dealing with chronic wet spots, this drainage resource is the right place to start.
Decision rule: if one area stays wet while the rest of the lawn dries normally, treat it as a drainage issue first, not a watering problem.
Adjusting Care for West Tennessee Seasons
West Tennessee doesn't give you one clean sod season, it gives you mood swings. Spring can look ideal for establishment one day and muddy the next, while summer heat asks for faster response times than a generic schedule would suggest. Fall is often the easiest rooting window, but only if you don't get lazy as temperatures slide.
In spring, rainfall can do part of the watering for you, but don't assume every shower is enough. Check seams after storms, because a light rain can wet the blades without carrying moisture down into the root zone. If a cool spell follows wet weather, hold back instead of stacking more irrigation on top of saturated soil.
Summer is the hardest stretch. Hot afternoons, reflected heat from concrete, and wind across open yards can dry out edges fast, so the perimeter deserves the most attention. If the lawn is still establishing, it's usually safer to water earlier in the day and keep the cycles consistent rather than chasing dryness after the turf has already wilted.
Fall gives you the best chance to transition toward a more normal routine. Once rooting has progressed, taper the irrigation rather than dropping it abruptly, and keep mowing high enough that the grass can still photosynthesize well as growth slows. If you're heading into cooler weather, the goal is to finish the season with a rooted lawn, not a stressed one.
One practical local check is this, if the soil stays wet long after the sun returns, the schedule is probably too aggressive for the site. If the soil dries quickly on the edges but not in the middle, the irrigation pattern or the grade is uneven. West Tennessee yards often have both problems at once, especially in newer subdivisions where the finish grade looks fine until the first few rain cycles expose the low spots.
When to Hire Pros and Final Recommendations
Standing water after rain, uneven growth that does not improve after the rooting window, and seams that keep drying no matter how carefully you water are all signs the problem may be bigger than day-to-day maintenance. Once drainage, compaction, or grading is driving the issue, more hand-watering usually makes matters worse, not better. That is the point where a professional assessment saves time and helps protect the sod you already paid to install.
Lawn & Leaf Solutions handles sod installation, drainage work, and ongoing maintenance in Jackson and West Tennessee, and their professional lawn service overview is a practical reference when a yard needs more than routine care. If you are dealing with a tricky slope, repeated puddling, or a lawn that still looks patchy after the establishment window, it makes sense to get eyes on the site before the next heat spell or storm makes the fix harder.
I have seen plenty of new sod fail for reasons that had nothing to do with watering discipline. The underlying problem is that the sod is still trying to root while the soil underneath stays too wet, too tight, or too uneven for new roots to move through. In West Tennessee, that often shows up in yards where the finish grade looks fine until the first few rain cycles reveal low spots, runoff paths, or irrigation coverage gaps.
Keep these five takeaways in mind. Water immediately and keep moisture consistent during the first two weeks, mow high and only after the grass is ready, keep people and pets off the turf until rooting starts, treat spongy spots as drainage clues, and adjust for West Tennessee weather instead of following a rigid schedule. If your new sod is already showing trouble, get a professional look at the grading and watering pattern now, before the next heat spell or storm turns a small problem into a full reset.
A final check is simple. If the soil stays wet long after the sun returns, the schedule is probably too aggressive for the site. If the edges dry out quickly while the middle stays soft, the irrigation pattern or the grade is uneven. Either way, a yard that keeps sending mixed signals needs more than guesswork, and a local crew can usually spot the cause faster than a homeowner can keep adjusting the hose or timer.