
Standing water on a driveway always looks small at first. Then the same patch stays wet after every rain, dirt tracks into the garage, and you start noticing where water has been creeping toward the edge of the slab. A channel drain can fix that problem cleanly, but only if the slope, outlet, and concrete support all work together.
The part often underestimated is not the trench. It's the discharge path. A drain that collects water beautifully but has nowhere sensible to send it is just a long, expensive gutter in the ground.
Planning Your Channel Drain Project
Before a shovel hits the ground, map the water the way a tradesperson would, not the way a homeowner hopes it behaves. Start by watching where runoff collects during a hard rain, then mark the lowest edge of the problem area and the route water can realistically take away from it. That route matters more than the grate style, because the drain only performs if the outlet can keep moving water onward.
The layout should be measured, not guessed. A widely used benchmark for the channel run is a minimum longitudinal fall of 5 mm per metre, which is the same as a 1:200 gradient. Another guidance source recommends a 1:100 fall, or 30 mm over 3 metres, to move water efficiently toward the outlet, so small mistakes in grading can absolutely matter. The same installation guidance also notes that the drain body usually sits about 2 mm below the surrounding surface, with about 50 mm of gravel or sand beneath and roughly 100 mm of concrete on each side for support. Those numbers are why a level-looking drain can still fail if the surrounding geometry is off, as outlined in a channel drain installation guide.
Decide where the water goes first
That decision should come before material shopping. If you can tie into a storm system legally, that's one path. If not, your options usually narrow to daylighting to grade or routing to a soakaway or sump, depending on site conditions and local rules. A useful outside perspective on that planning problem is backyard drainage ideas for South Carolina, because it shows how discharge thinking changes with yard layout and climate.
Practical rule: if you can't explain where the water exits in one sentence, the layout isn't ready yet.
For a broader drainage approach around the property, it also helps to look at how to improve lawn drainage, since the channel drain often needs to work alongside yard grading rather than replace it.
Mark the problem area with the outlet in mind
Run a string line from the collection point to the planned discharge point, then check that the fall is consistent all the way through. If the yard has no obvious outlet, stop and solve that before excavation. That's the stage where a lot of DIY jobs stall, because the drain body is easy compared with the discharge decision.
Use the planning pass to confirm the drain length, the turn points, and the connection hardware you'll need. A clean layout now prevents a messy concrete cut later.
Tools and Materials You Will Need
A channel drain install goes easier when every part is on site before the first cut. The tool list is plain enough, but the details matter. You need measuring gear, cutting tools, and the right support materials so the channel holds its line while the concrete cures.
A practical checklist looks like this:
- Channel drain sections and grates: Match the system to the load it will carry. Patio foot traffic and driveway use call for different ratings.
- Outlet fittings, elbows, end caps, and adapters: These pieces carry water from the channel body into the outlet pipe.
- 4-inch or 110 mm outlet pipe: This is the common connection size used in professional driveway and patio drainage work.
- Concrete mix: Use it to lock the channel in place and keep it from shifting.
- Gravel or sand bedding: The base layer supports the channel body evenly.
- Rebar or wire ties: These help hold the drain flush while the pour cures.
- Tape measure, string line, laser level, and spirit level: These keep the fall and height consistent.
- Shovel, trenching tools, and a concrete saw or masonry saw: These help with excavation and clean paving cuts.
- Buckets, trowels, and compaction tools: Useful for backfill and finishing.
The hidden pieces matter just as much as the visible drain body. A lot of DIY installs go sideways because someone buys the channel sections and forgets the transition fittings, the outlet hardware, or the support pieces that stop movement during the pour. A drain can look straight before concrete goes in and still fail at the joint if the outlet planning is weak.
Cost planning belongs in this stage too, because the outlet path changes what you need to buy. Material pricing can vary by drain style, pipe run, and fittings, so it helps to compare the drain kit against the full connection list before you start. For a practical check on how outlet decisions affect the rest of the build, see how yard grading affects drainage planning. That is where DIY jobs usually get expensive, and where Lawn & Leaf Solutions often becomes the right call when the discharge route is not obvious.
Digging the Trench and Setting the Drain
Cutting and excavation are where precision starts to pay off. The trench needs to be wide enough for the channel body and deep enough to allow the bedding, the drain body, and the side concrete to sit correctly without forcing the grate too high or too low. For many driveway and patio jobs, installers commonly excavate around 6 inches deep for the drain body, then adjust for the finished height and support structure.
Set the base before you set the channel
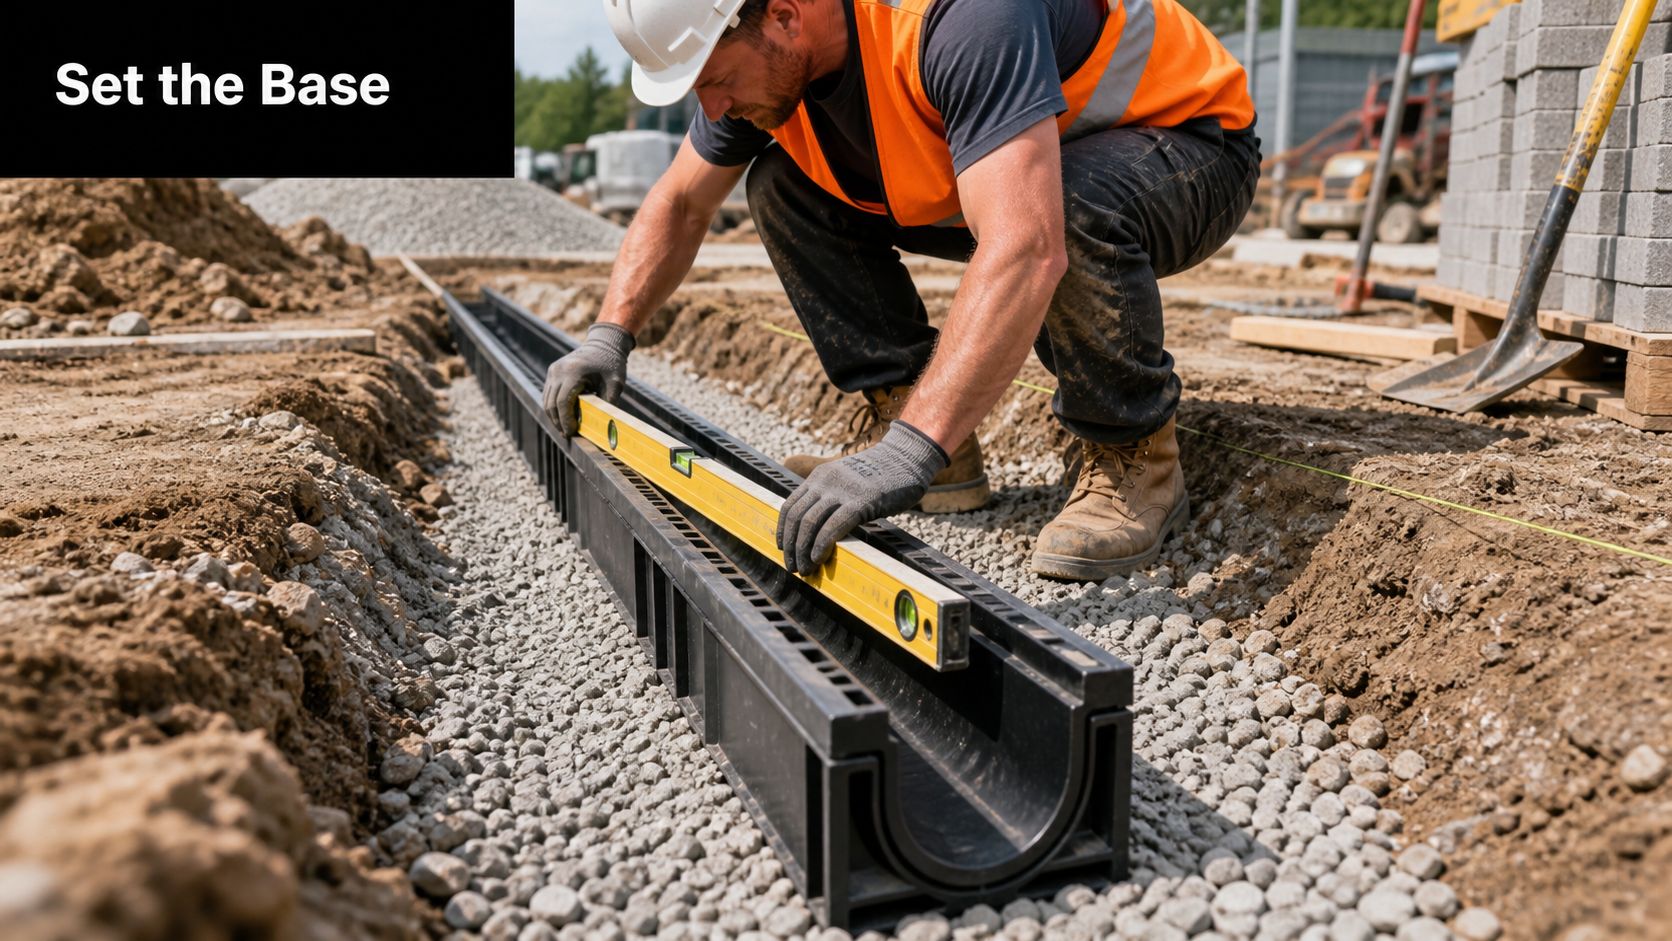
Lay down the 50 mm gravel or sand bedding first, then compact it evenly. That base gives the drain something stable to sit on, and it helps avoid point loading under the channel body. If the bedding is lumpy, the grate may sit proud in one spot and low in another, which becomes a trip hazard or a future crack line.
Keep checking the height against the surrounding surface. The drain body should sit about 2 mm below the surrounding surface, not level with it and not buried under it. That slight drop helps the system intercept runoff before it sheets across the slab or pavers.
Hold the fall while you lock in the line
The channel run needs a measurable slope, and the outlet pipe needs to keep that same logic. Use a string line or laser level to confirm the fall before you pour any concrete. A good benchmark is 5 mm per metre, and some guides push for 1:100, which gives water more confidence moving toward the outlet. If the slope reverses anywhere, the water will find that flat spot and sit there.
Water doesn't care how clean the trench looks. It follows the easiest low point.
Once the drain sections are in line, brace them with rebar, wire ties, or a suspension method so they don't float or shift during the pour. Then place the concrete around the sides, with about 100 mm of concrete on each side to anchor the system. That side support is what keeps the grate from settling under repeated driveway load.
For a deeper look at shaping the surrounding grade correctly, this yard grading guide is worth reading before you lock in the trench depth. The drain can only perform as well as the surface feeding it.
Connecting Your Channel Drain to the Outflow System
This is the step that separates a functional drainage build from a nice-looking trench with nowhere to go. Cut the paving cleanly, then connect the channel body to a 4-inch or 110 mm outlet line using the proper elbows, end caps, and adapters. That outlet line needs to carry water away at a consistent pitch, and one common benchmark is about 1% slope, or 1 inch of fall per 8 feet of pipe.
A lot of DIY installs go wrong here because the outlet is treated like an accessory. It isn't. The connection determines whether collected water leaves the property, backs up under the grate, or gets trapped in the lowest section of the channel. A professional method is to dry-fit the pieces first, confirm the outlet direction, and only then seal everything in place.
If the line is blocked, undersized for the site, or tied into a poor discharge point, the drain will underperform no matter how tidy the trench looked. That's why many homeowners benefit from a drain specialist like Total Plumbing drain services when the outlet side is uncertain or the existing line needs inspection before connection.
Pick the discharge route before you lock the fittings
The main outlet choices are simple in theory and tricky in practice. A drain can tie into a storm system, daylight to grade, or route toward a soakaway or sump pump, but the right choice depends on the site, local limits, and available fall. That discharge question is the one many guides skip, and it's usually where the complexity lives.
If the yard has no obvious outlet, don't force a connection just because the trench is open. You may need to stop and redesign the discharge path first. That can save you from burying a system that only moves water from one problem spot to another.
For foundation-adjacent work, the outlet logic should also line up with how to extend downspouts, since roof runoff and surface runoff often need to be managed together. The channel drain and the downspout plan should support the same exit path, not compete with each other.
Best practice: test the connection path with dry-fit pieces before you commit to solvent or concrete, because outlet mistakes are harder to fix than trench mistakes.
Testing, Backfilling, and Finishing the Surface
The drain is not finished when the concrete goes in. It is finished when the water test passes, the concrete has had time to set, and the final surface sits tight around the grate without rocking or chipped edges. In practice, that means you wait for the concrete to cure before putting the drain into use. Some installers wait longer before letting vehicle traffic cross it, especially on a fresh pour.
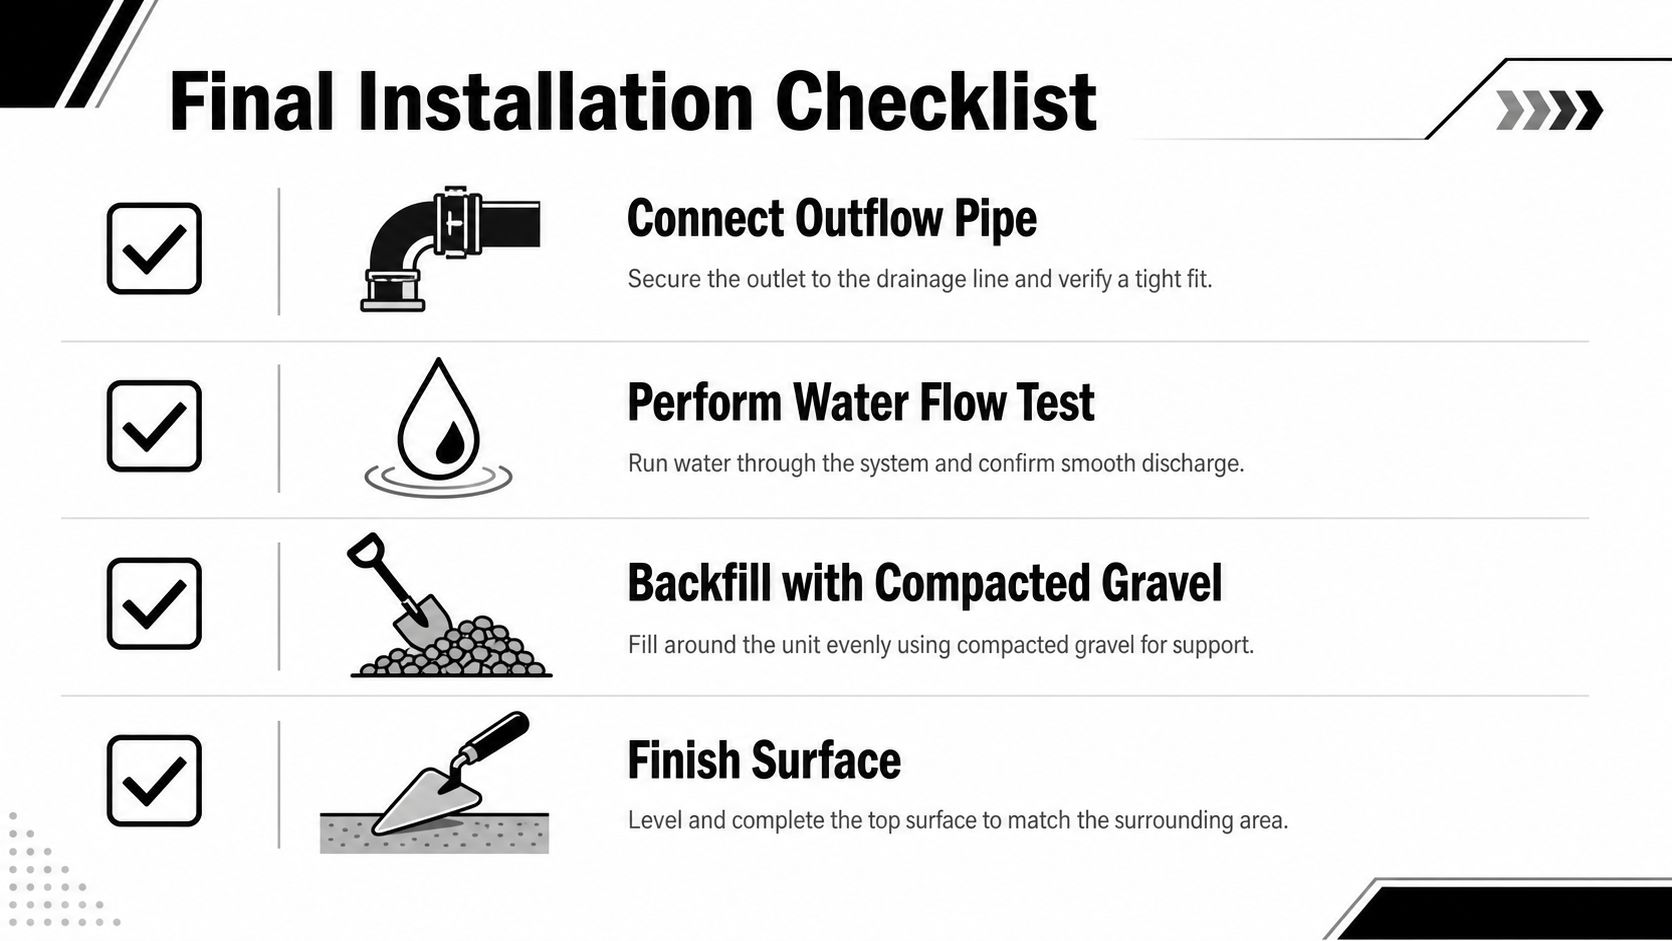
Run water through the system before you seal anything up. Watch the inlet, the channel, the outlet, and the discharge point. If water backs up in the body, the slope is off. If it clears the grate but hangs in the outlet line, the issue is downstream, and that is the part that tends to separate a clean DIY job from one that needs a drain specialist.
Backfill only after the system proves itself
Once the test passes, backfill in layers and compact as you go. Loose fill around a drain settles later, especially where cars or heavy foot traffic cross the area. The concrete support and the backfill need to work together. If they do not, the grate edge can start dropping, and that usually shows up after the first hard rain or the first season of freeze and thaw.
Finishing choices depend on the surface around the drain. A concrete apron gives the cleanest structural transition, pavers look more integrated in a patio setting, and landscaping can soften the edge if the drain sits near planting beds. Each option changes how the load moves into the surrounding ground, so the finish has to fit the site, not just the look. If the drain is part of a larger water management plan, the surface finish should also fit the broader drainage design, including the kind of outlet work covered in this drainage installation cost breakdown.
The biggest mistake is rushing the finish because the top looks dry. Surface-dry concrete is not the same as a fully set, load-ready installation. If a vehicle crosses too early, the movement can show up later as a cracked edge or a sunken grate, and that repair is usually more annoying than waiting a little longer at the start.
Finish for function, not just appearance
Keep the grate flush with the final surface and make sure the nearby finish does not build a hump that pushes water away from the inlet. If you are tying into existing pavers or a slab, the junction needs to be clean and stable, not patched with a thin smear of filler. A durable edge is what keeps the drain working after the first hard rain, and it is what keeps the install from looking rough six months later.
Installation Costs and When to Call a Professional
Channel drain installation is light on materials and heavy on labor. One industry guide puts material costs at about $45 to $100 per 6 feet, and says the full DIY material bill can reach roughly $200 once concrete, pipe, fittings, and other supplies are included the Angi installation cost guide. The bigger cost is the work around the drain, especially when the outlet has to be planned, tied in, and tested before the trench gets buried.
That price gap makes sense once you factor in cut work, slope control, concrete placement, cure time, and outlet planning. Those steps are where a channel drain either works for years or turns into a puddle trap after the first heavy storm. A short run can still become a difficult job if the discharge path is buried, the grade is uneven, or the drain has to cross structural concrete.
For homeowners, DIY is most reasonable when the discharge path is obvious, the grade is manageable, and the surface is straightforward. It gets less forgiving when the drain has to cross an existing slab, connect to a hidden outlet, or solve recurring water near a foundation. If you are trying to compare that kind of drainage work with other yard projects, this French drain cost guide helps show how outlet work and site access can change the job far more than the drain body itself.
Lawn & Leaf Solutions handles channel drain installation as part of its drainage work in Jackson, TN and West Tennessee, with on-site drainage evaluation, design, and installation among its services. That matters most when the job needs a custom outlet plan, a foundation-adjacent connection, or a driveway cut that has to be right the first time. Their drainage work also sits alongside other water-management services, which is useful when the drain has to fit into a larger fix instead of acting as a stand-alone trench.
The practical cutoff is straightforward. If the project involves unknown discharge, structural concrete, or repeated pooling after past DIY fixes, bring in a pro. The hardware is cheap compared with repairing a bad outlet or a cracked edge later.
Common Channel Drain Problems and Maintenance Tips
The most common failures aren't dramatic. They show up as slow drainage, standing water by the grate, a settling edge, or water that seems to disappear from the channel and reappear somewhere else. In field terms, the usual culprits are a blocked outlet, poor pipe pitch, inadequate concrete support, or a grate that's starting to settle.
Spot the problem by where the water stops
If water sits in the channel after a rain, the outlet or pitch is usually the first place to check. If the grate has dropped or rocks under foot, the support under the body has probably moved. If the area drains slowly only during heavy flow, the discharge line may be partly obstructed or the system may be tied into a weak outlet path.
A simple maintenance routine keeps the system honest. Clear debris from the grate during leaf drop, rinse the channel after storms, and check how water moves through the system after heavy rain. A maintenance habit like that is far cheaper than tearing out a failed section later.
For ongoing care around drainage systems, this French drain maintenance guide is useful because the same principles apply here, keep the outlet open, keep the surface clear, and look for movement before it becomes structural damage.
If the grate starts to settle, don't just top it up with loose material. Find out why the support moved first.
Know when a DIY fix isn't enough
A blocked outlet that keeps returning, a pitch issue that can't be corrected from the surface, or movement in the concrete bed usually needs a more serious repair. That's especially true on driveways and other high-traffic areas, where structural support matters as much as water flow. Once concrete or subgrade movement starts, cosmetic fixes rarely hold.
A channel drain should disappear into the surface and do its job effectively. When it starts calling attention to itself, the system is telling you something in the slope, support, or discharge path needs to be reworked.
If you want a channel drain installed with the slope, outlet, and finish handled as one system, Lawn & Leaf Solutions can take a look at your property and map out the right approach. Visit Lawn & Leaf Solutions to request drainage help that fits your yard, your driveway, and the water problem you're dealing with.