
You've got a patch of yard that looks fine from the back door, then the first hard rain shows you the truth. Water hangs around in one corner, the lawn dips toward the fence, and the spot you wanted for a garden feels like the one place that might drown seedlings or twist a frame out of square. That's the starting point for how to build raised garden beds, not the lumber pile, because a bed that's placed well will outlast a prettier one dropped onto the wrong ground.
A lot of homeowners start with the easiest-looking patch of grass and regret it later. The better move is to read the yard like a builder, then decide whether you're making a simple freestanding bed or a more careful installation that respects slope, runoff, and drainage from the first cut. If you want a planning mindset before you buy boards, the layout thinking in Designing a productive garden pairs well with the practical yard-reading approach in landscape design basics.
Picture the Bed in Your Yard Before You Cut a Board
A raised bed fails fast when it's built where the yard is already telling you not to build. I've seen homeowners set one on a flat-looking corner of lawn, only to learn after the first season that the spot sits in afternoon shade, catches roof runoff, and never really dries out. The frame itself wasn't the problem, the placement was.
Walk the yard like a contractor
Start in the morning and check the spot again around midday and late afternoon. You're looking for the sun to stay on the area long enough for vegetables to do real work, and you're also looking for places where water lingers after a storm. Low spots, mossy patches, and dark wet rings around the soil are all clues that the ground won't behave like a well-drained planting pad.
If you can, trace the route from your spigot or hose reel to the bed area before you commit. A bed tucked too far from water becomes a chore, and a bed tucked too close to a wall or fence can suffer from shade and poor airflow. The sweet spot is the place you'll use, not the place that looks neat on paper.
Practical rule: the best site is the one that balances sun, drainage, and access before you ever pick up a saw.
Decide whether the yard needs help first
Some yards are honest about being difficult. If the ground falls away, if runoff cuts across the future bed footprint, or if you can see water pooling after a storm, the bed probably needs drainage thought baked into the plan. On sloped properties, a bed is often better treated as a small site improvement rather than a simple box.
That's especially true in Tennessee yards with clay subsoil, where water moves slowly and the wrong spot can stay soft longer than you want. When that happens, a quick build becomes a long repair if you ignore the grade. For homeowners trying to avoid that mistake, the drainage guidance in how to improve clay soil drainage is worth reading before the first board is cut.
Siting the Bed for Sun, Access, and Drainage
Vegetables need real sun, and a garden bed that sits in the wrong light becomes decorative faster than anybody wants to admit. The simplest field test is to watch the spot over a normal day and notice whether it gets long, uninterrupted sun or only brief bursts between trees, porches, and rooflines. If the area never feels bright for much of the day, it's not the right home for a productive bed.
Put convenience and drainage in the same sentence
A bed near the kitchen door is easy to harvest from, easy to water, and easy to check on after work. A bed farther out in the yard may get better light and better air movement, which matters more than convenience if the closer spot stays damp or shaded. In a small yard, that trade-off is real, and the better choice is usually the one that protects plant health first.
Accessibility matters too. Keep enough room around the bed to move with a hose, a bucket, or a wheelbarrow without brushing the frame every time you turn. A working path saves the bed edges from getting kicked, mudded up, or compacted by traffic.
Practical rule: if you can't reach it cleanly, water it easily, and work around it without stepping into the bed, the layout isn't finished yet.
Check the ground before you dig
Before any digging, locate buried utilities and look carefully at how the water behaves on that patch of yard. A bed sitting downhill from a downspout or in the lowest point of a yard often inherits the site's drainage problem instead of solving it. That's where homeowners get surprised, because the frame looks finished while the soil underneath keeps acting like a basin.
The physical size of the bed should match the reach of the person maintaining it. A bed that's too wide forces stepping into the soil, which defeats the whole point of a raised bed, and the recommended 3 to 4 feet width exists for exactly that reason, so gardeners can reach the center from both sides without compacting the planting area Utah State University Extension. The same Utah guidance recommends loosening the existing soil 6 to 12 inches deep before adding the bed mix and working in 2 to 3 inches of organic matter at the base, which is part of why site prep matters before the frame goes up.
Choosing Materials, Dimensions, and Height
Material choice is where a lot of people overthink the project, then underthink the site. Boards and blocks all work, but they behave differently once Tennessee humidity, wet soil, and seasonal movement get involved. You want a material that matches the look you can live with, the maintenance you'll do, and the kind of load the bed will hold after a few seasons.
Match the bed to the job
A bed that will sit on a dry, level patch can be simpler than one built into a slope. A bed holding heavy vegetables and deep soil needs stronger framing than a shallow herb box. If the location is imperfect, the build should reflect that instead of pretending the ground is flat and stable when it isn't.
The 3 to 4 feet width rule stays useful here because it keeps the frame manageable from both sides. Height depends on the crop and on your back, but it also changes how much soil the frame must hold and how much pressure the sides will take once the bed is wet. A taller bed is easier to work, but it demands better framing and more care during assembly.
What to expect from common materials
Some homeowners want the warm look of wood. Others want the low-maintenance feel of block or steel. The right answer depends on whether the bed needs to move with the slope, resist bowing, or sit cleanly beside a patio.
| Material | Typical Lifespan | Cost per Linear Foot (approx.) | Best Fit |
|---|---|---|---|
| Untreated cedar | Not stated in verified data | Not stated in verified data | Natural look, food garden settings |
| Pine | Not stated in verified data | Not stated in verified data | Budget builds, shorter-term use |
| Composite boards | Not stated in verified data | Not stated in verified data | Low-maintenance garden edges |
| Concrete block | Not stated in verified data | Not stated in verified data | Permanent, heavy-duty layouts |
| Galvanized steel | Not stated in verified data | Not stated in verified data | Durable frames in wet conditions |
The table above keeps the choice honest. If you're unsure, start with the material that fits the site, then build the dimensions around it instead of forcing the yard to accept whatever size is convenient in the store. For homeowners considering timber-based framing, the installation notes in landscape timber installation are a useful companion while you sort out dimensions and edge support.
Building the Frame From Ground to Top Rail
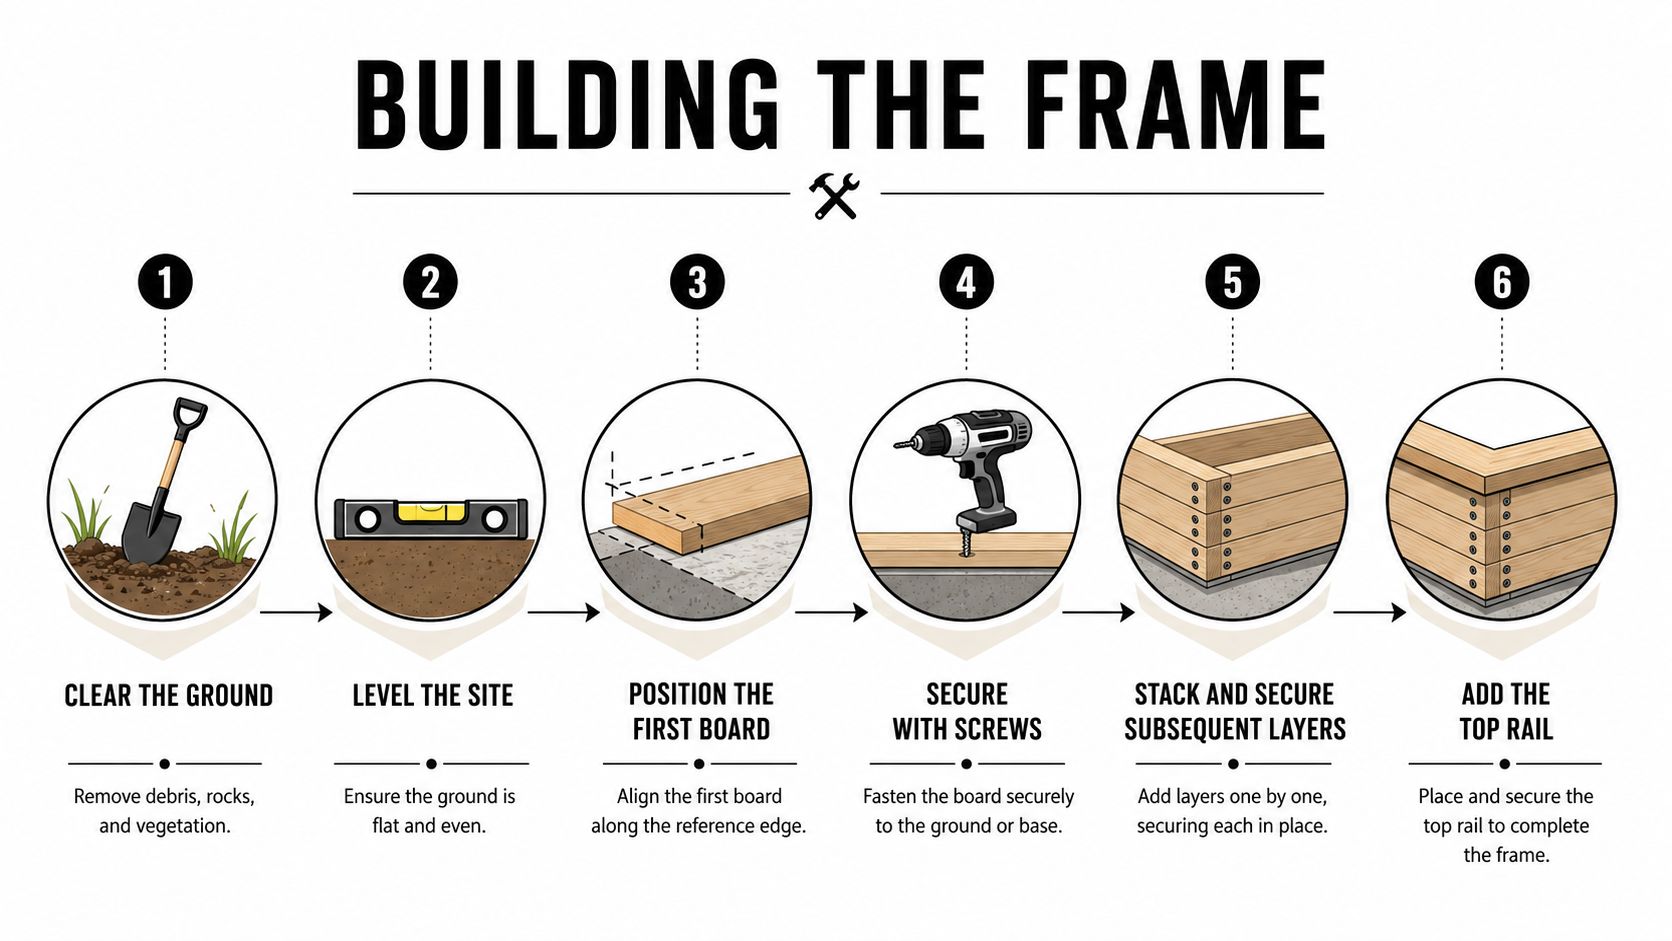
The frame holds everything together, so sloppy work shows up later as bowed sides, out-of-square corners, or a bed that looks “close enough” until you try to cap it. Start by clearing rocks, roots, and debris from the footprint, then level the site as best you can before any boards go down. If the yard slopes, don't fight it with wishful thinking, dig a level footing, step the bed like a terrace, or anchor it so the frame doesn't creep downhill as the soil settles.
Square the box before you trust it
Set the first boards where the bed is going to live, then check the corners with a carpenter's square before fastening the rest. A frame can look acceptable by eye and still be slightly racked, which becomes obvious after you add soil and the pressure pushes the longer sides outward. Pre-drilling helps keep the boards from splitting, and multiple exterior or deck screws per corner keep the joints tighter than a single fastener ever will.
If the bed is on uneven ground, get the long sides level before you move on. That's where a lot of first-time builds go sideways, because one end ends up right and the other end slopes away until the whole bed is out of plane. The frame should be corrected while it's still easy to move, not after the soil is in place.
Most common mistake: skipping the level check on the long sides, then trying to fix the bed after it's already anchored and partially filled.
Anchor for the yard you actually have
On a slope, a bed often needs help resisting movement. Stakes or rebar can keep the frame from sliding, and short stepped runs work better than one long box trying to hover over a grade that wants to move. That's the point where a slope-specific approach beats a flat-lawn tutorial every time.
Use the build to think about durability, not just appearance. A clean top rail is nice, but the bed has to survive wet fill, summer heat, and corner pressure year after year. For readers who want another practical build reference, the framing logic in retaining wall installation helps explain why square footing and stable support matter so much in real yards.
Filling the Bed With the Right Soil Mix
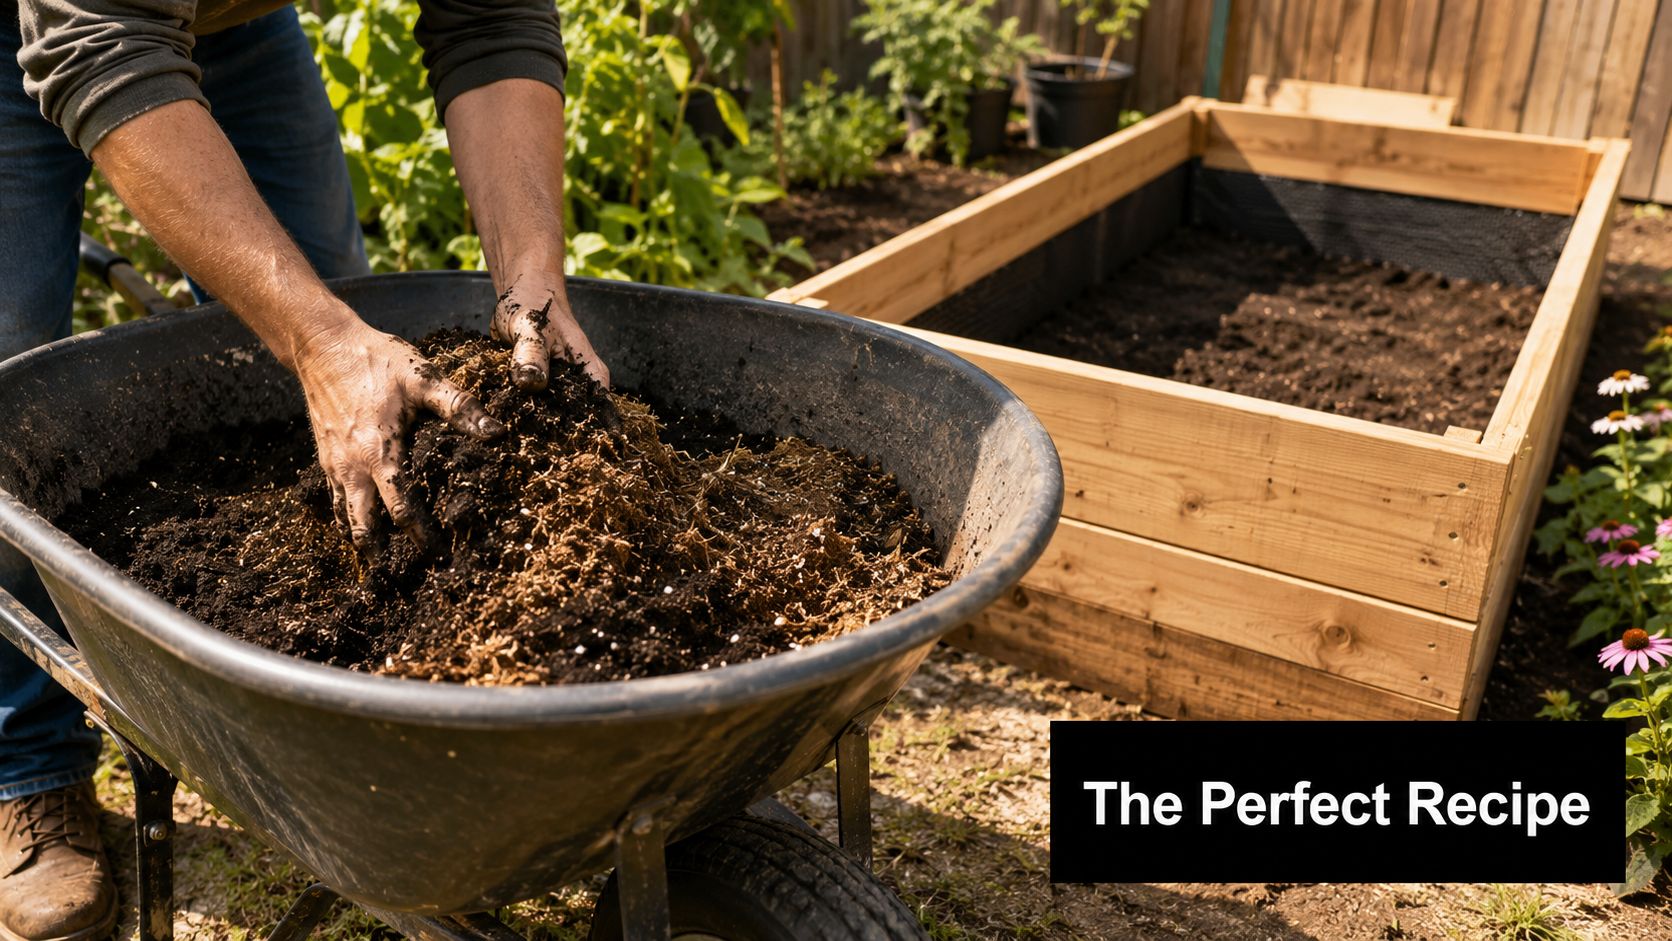
The fill matters more than the wood in a lot of beds, because weak soil turns a solid frame into a shallow pot. A raised bed only works well when the mix drains, feeds roots, and stays open enough that water moves through instead of sitting on top like it does in compacted yard soil. Straight native soil usually packs down too tightly, especially in beds built on clay or other slow-draining ground, and that works against the drainage the frame was meant to give you.
Build the fill to settle, not to stay fluffy
The Royal Horticultural Society advises filling the bed to about 5 cm (2 in) below the rim, firming the soil, and then letting it settle for a couple of weeks before sowing or planting RHS. That headroom matters because the soil drops after watering and compaction, and a bed that starts too full often ends up awkwardly mounded or low around the edges.
Utah State University Extension also recommends loosening the existing soil 6 to 12 inches deep before adding the bed mix and working in 2 to 3 inches of organic matter into that base layer. That kind of prep gives the roots a softer transition into the native ground, which is especially useful in tougher soil and in yards where drainage changes from one end of the bed to the other.
Choose the mix for the site, not just the plant list
For a bed on a patio or rooftop, bagged mix can make sense because weight and cleanup matter. For a yard bed, bulk soil and compost usually make more practical sense because you are filling volume, not dressing up a planter. In deeper beds, woody debris can help in the lower layers if you want to stretch material while still keeping the upper root zone workable, but it should not take over the part of the bed that roots need most.
A good soil is only half the job. If the fill sits in a badly drained spot, the bed still struggles, which is why the soil choice and the site choice have to work together. For a closer look at the living side of the mix, healthy soil and pest solutions pairs well with the science of healthy soil, especially when you are deciding how much compost to blend in and how fast the bed should drain after a Tennessee rain.
Planting, Watering, and Seasonal Care
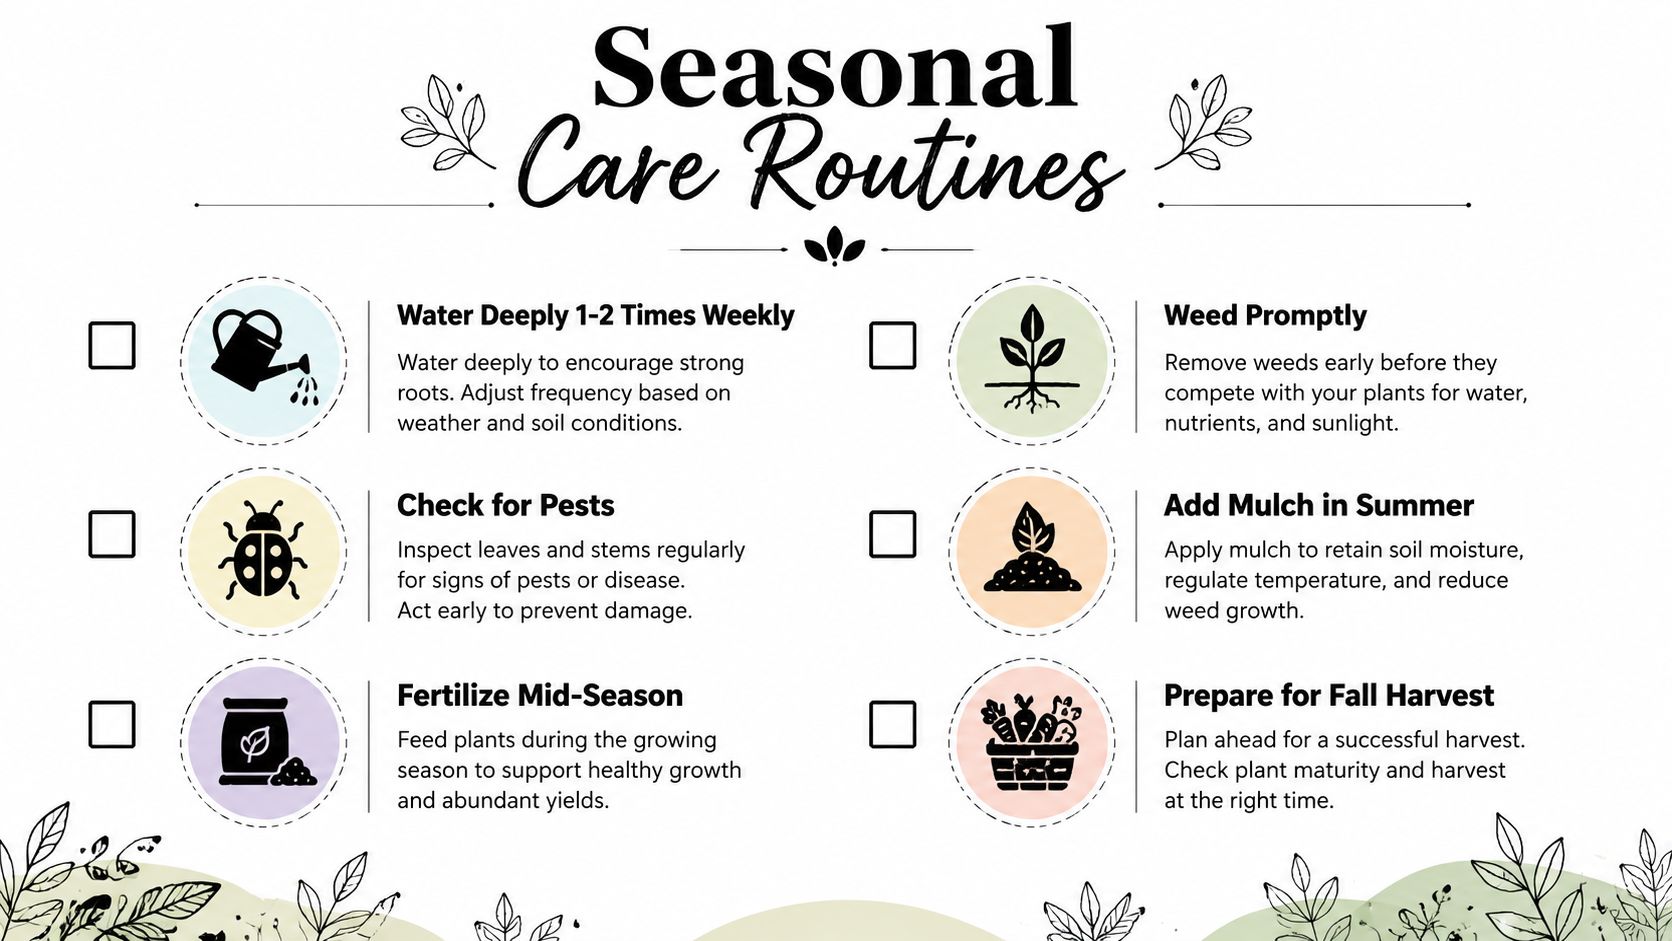
A raised bed earns its keep when the routine stays simple enough that you keep doing it. Once the frame is stable and the soil has settled, the main job is keeping moisture even, keeping weeds down, and topping up the bed before it starts looking tired. That's what turns a neat weekend project into a productive garden that keeps working through the season.
Keep water where the roots can use it
Soaker hoses and drip irrigation make the most sense when a bed sits in full sun and needs regular attention without hand watering every day. Hand-watering works fine for smaller beds or for gardeners who are outside often enough to notice dry soil early. The key is consistency, because raised beds dry out differently than ground beds and don't forgive long gaps as easily.
Mulch does a lot of quiet work here. It slows evaporation, keeps splash from tossing soil onto leaves, and helps the surface stay more even through hot weather. It also reduces the amount of bare soil exposed to heavy rain, which matters in a bed that started with a carefully built mix.
Keep the season moving
Staggering plantings keeps the bed productive instead of front-loaded. A bed that's planted all at once can surge early and stall later, while a staggered approach lets you keep harvesting as space opens up. The key is to treat the bed as a living system, not a one-time installation.
A basic year-round rhythm helps. Add compost in spring, feed heavy growers during the season, refresh mulch in fall, and check the frame in winter for loose screws or corners that have shifted. That kind of maintenance is cheaper in time and money than rebuilding a warped box later.
Troubleshooting Common Problems and When to Call a Pro
Raised beds usually fail in familiar ways, and most of them show up before the whole structure is ruined. A side that starts bowing outward points to pressure from wet soil or weak fastening. A bed that stays soggy after rain usually means the site drains poorly, not that the plants are unusually fussy.
Read the symptom before you reach for the fix
If the frame has gone out of square, check whether the corners were braced well enough when it was built. If the boards are rotting at the soil line, the bed may be sitting in a wet pocket or taking repeated splash from runoff. If the soil level keeps dropping more than expected, the fill may need topping off and the bed may need better settling and retention.
The smallest fix is usually the right one. Add support where the long sides bow, improve the grade beside the bed if water keeps standing, and redirect water away from the footprint if a downspout is feeding the problem. On a slope, a shallow drainage cut alongside the bed can keep runoff from pushing straight through the planting area.
Call a drainage or landscape professional when standing water lingers, the bed sits downhill from a downspout, or the slope has turned one bed into an erosion problem.
Know when the project has outgrown a weekend
Some sites need more than another board, another stake, or another bag of soil. If water continues to sit after rain, if the surrounding yard is sloughing soil toward the bed, or if the frame keeps moving every season, the issue has become a site problem rather than a garden box problem. That's the point where experienced drainage help saves time and avoids rebuilding the same failure twice.
Lawn & Leaf Solutions handles the kind of yard conditions that make raised beds fail early, from standing water and runoff to erosion control and drainage corrections in Jackson and West Tennessee. If your yard needs a bed that works with the grade instead of fighting it, visit Lawn & Leaf Solutions and get help turning a wet, uneven spot into a garden that holds up season after season.