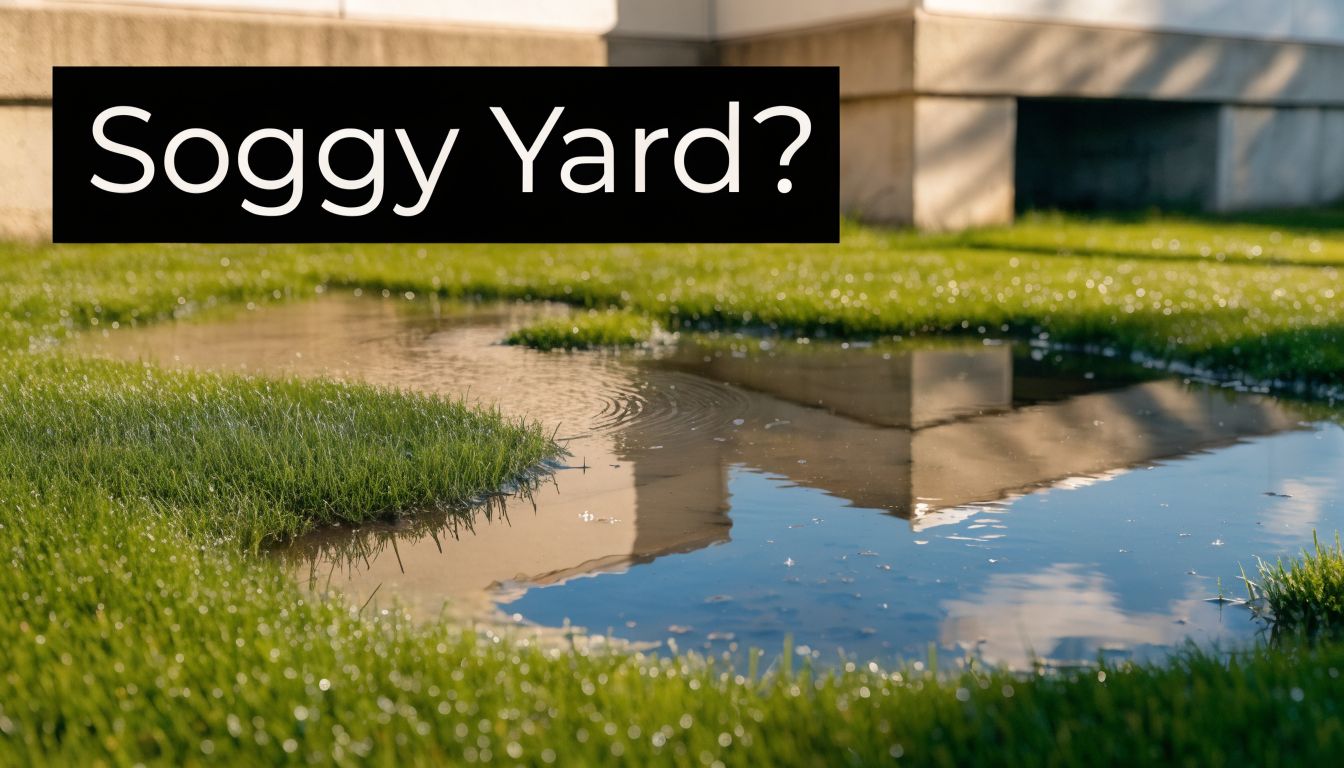
If you're reading this, there's a good chance your yard stays soft long after the rain stops. Maybe water sits near the foundation. Maybe one side of the lawn never dries out, and every storm turns that area into a muddy mess you have to work around.
That usually means the water has nowhere useful to go.
A French drain can fix that, but only if it's planned and installed correctly. I've seen plenty of drains that looked fine on day one and failed because the outlet was wrong, the slope was off, or the system got wrapped up with the wrong materials. If you want to know how to install a french drain system that functions effectively, you need to think beyond the trench. You need to think about the whole life of the drain, from layout to maintenance.
Is a French Drain the Right Solution for Your Soggy Yard
Some drainage problems call for pipe in the ground. Others don't.
If water shows up as a broad sheet flowing across the surface during a storm, a grading correction, swale, or channel drain may be the better first move. If the ground stays wet below the surface, water pushes toward the house, or a low area remains soggy for days, a French drain is often the right tool.
What a French drain actually does
A French drain is an underground drainage path. Water moves through gravel into a perforated pipe, then flows to a safe outlet away from the trouble spot. The pipe isn't the whole system. The gravel, trench layout, fabric, and discharge point matter just as much.
This setup works well for problems like:
- Water collecting in one low section of the yard where mowing becomes difficult and turf thins out
- Moisture building near the foundation where runoff keeps soaking the same area
- Subsurface saturation that leaves the lawn spongy even when you don't see active runoff
- Drainage behind hardscape or slopes where trapped water needs a controlled exit
If water pressure is building behind a retaining wall, drainage becomes a structural issue, not just a lawn issue. In that case, this guide on retaining wall safety for homeowners is worth reading before you start digging.
When a French drain isn't the first fix
A French drain won't correct every wet-yard problem. If the yard is pitched back toward the house, surface grading may need attention first. If all the roof water is dumping in one place, downspout routing may be the primary issue. And if water is entering a basement or crawlspace from below, you may need to compare interior and exterior drainage approaches, including a sump pump vs French drain setup.
A French drain is a collection system. It is not a cure for bad grading, careless roof runoff, or an outlet that has nowhere to discharge.
Quick self-check before you commit
Walk the property after a steady rain and look for patterns.
- Check where water starts. Is it flowing downhill from another area, or rising from saturated soil?
- Look at how long the area stays wet. Temporary surface runoff and constant subsurface seepage are different problems.
- Follow the possible exit path. If you can't get water to a lower and safe discharge point, the drain design gets more complicated fast.
When a French drain fits the problem, it can be a solid long-term solution. When it doesn't, homeowners end up burying pipe and gravel without solving the reason the yard is wet.
Planning Your Project and Gathering Materials
A French drain usually fails on paper before it fails in the ground. The trouble starts with a route that ignores the outlet, pipe bought on sale instead of for the soil conditions, or a trench plan that leaves no way to clean or repair the system later.
That is why I slow down here. Good planning saves digging twice.
The first decision is scope. A short, straight run across open yard is one kind of project. A drain that has to pass near a foundation, hardscape, tree roots, or utility corridors is a different animal. The second type can still be done by a capable homeowner, but the margin for error gets small fast, and the cost of a mistake goes up.
Map the route before you buy anything
Start where the water collects or seeps in. Then work outward to the discharge point. If you cannot identify a legal, safe place for the water to leave, do not buy pipe yet.
A workable route needs to be diggable, protected from future disturbance, and accessible enough that you can inspect or repair parts of it later. That last point gets skipped in a lot of DIY guides. It should not. Every French drain has a service life, and the ones that last longest are the ones built with maintenance in mind.
Keep the path simple. Long sweeping runs are easier to build right than zigzags with extra fittings. Avoid tree roots, fence posts, patio footings, irrigation lines, and spots likely to be disturbed by future garden work or utility repairs.
Before trenching, call 811 and have utilities marked. No exceptions.
Practical rule: If the outlet is still a question mark, the project is not ready to start.
Choose materials that still make sense five years from now
Homeowners often focus on the pipe and overlook the rest of the system. The pipe matters, but the stone, fabric, and layout choices usually decide whether the drain stays open or slowly fills with fines and quits working.
Here are the parts that deserve attention:
- Pipe. Most residential jobs use 4-inch perforated pipe. Rigid PVC holds grade better and gives a cleaner finished run. Corrugated pipe is easier to snake around obstacles and easier to handle, but it can dip if the trench bottom is sloppy. Those low spots collect sediment.
- Filter fabric. Use drainage fabric made to separate soil from stone. Skip the wrong fabric, or skip fabric entirely, and the gravel bed starts loading up with sediment much sooner.
- Stone or gravel. Use clean, washed drainage stone. Dirty aggregate brings fines into the trench on day one, which shortens the working life of the system.
- Catch basin or inlet grate. Use one where surface water needs a defined entry point. If the problem is mostly subsurface seepage, a basin may add cost without adding much value.
If you're comparing pipe, fabric, and stone options, this guide to the best materials to construct a french drain that lasts is useful because it looks at lifespan and serviceability, not just shelf price.
Decide how you're going to dig
Hand digging works on short, open runs. It is slow in compacted soil, heavy clay, or root-filled ground. A trencher saves time, but it does not guarantee a good trench. You still have to clean up the bottom, check your fall, and keep the width consistent enough for the stone envelope to do its job.
The digging method should match the site. Near a house, retaining wall, patio edge, or established plants, control matters as much as speed. In those spots, I would rather see a careful trench dug in sections than a rushed machine cut that creates damage and leaves an uneven bottom.
Also think past installation day. If a line ever clogs, sags, or gets crushed by later work, where will you expose it? How hard will it be to inspect? Planning for maintenance now is cheaper than troubleshooting blind after the yard is finished.
French drain installation checklist materials and tools
| Item Category | Specific Item | Notes |
|---|---|---|
| Layout | Stakes and string line | Helps mark the drain path and keep the run straight |
| Layout | Tape measure | Needed to mark distances and plan the fall |
| Layout | Line level or similar leveling tool | Helps check the trench grade during layout |
| Digging | Trenching shovel | Useful for hand shaping and cleanup |
| Digging | Round-point shovel | Good for moving spoil and backfill |
| Digging | Mechanical trencher | Often worth renting on longer runs |
| Hauling | Wheelbarrow | Needed for soil, gravel, and cleanup |
| Drain components | 4-inch perforated pipe | Standard pipe size for residential systems |
| Drain components | Pipe fittings and connectors | Use what matches your layout and outlet plan |
| Drain components | Inlet grate or catch basin | Use where water needs to enter at a specific point |
| Filter layer | Filter fabric | Lines the trench and wraps the stone |
| Aggregate | Crushed gravel or stone | Surrounds the pipe and supports water movement |
| Finishing | Fabric pins | Helpful for keeping fabric in place while you work |
| Testing | Garden hose | Used to test flow before final finish work |
| Safety | Work gloves and boots | You're handling stone, pipe, and rough excavation |
Trade-offs that matter
Cheap pipe can work in the right setting. Cheap fabric usually does not. Flexible pipe is easier to install. Rigid pipe is easier to keep on grade. More stone improves water movement, but it also increases hauling and excavation. Those are real trade-offs, not marketing points.
Build for the full life of the drain, not just for the day you bury it. Water needs a clear path, soil needs to stay out of that path, and you need at least a basic plan for inspection, cleaning, and repair if the system starts showing trouble later. That is the difference between a drain that buys you a season and one that keeps working for years.
The Digging and Installation Process Step by Step
A French drain usually succeeds or fails in the trench, not at the supply store. I have seen plenty of yards where the pipe, stone, and fabric were all decent, but the system still held water because the trench bottom wandered, the pipe sagged, or dirt got mixed into the gravel before the job was even closed up.
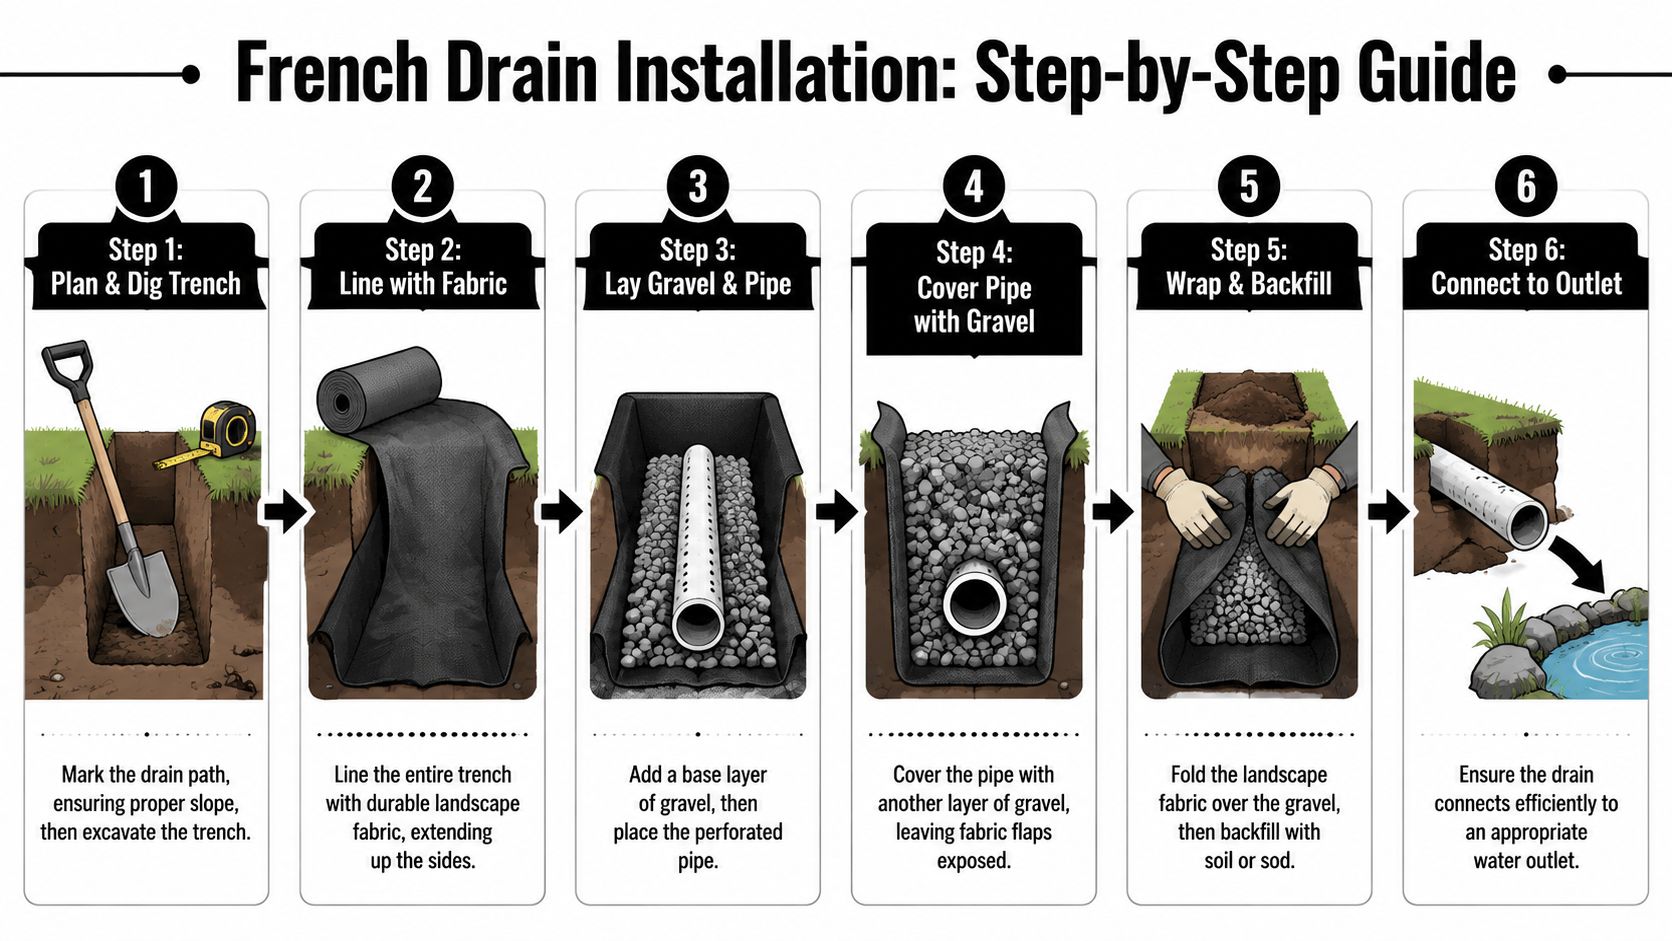
Dig the trench with the finished system in mind
Start at the outlet end and work uphill. That one decision makes grade control easier, and it helps prevent the common DIY problem of reaching the low end late and finding out there is nowhere for the water to go.
Keep the trench consistent enough that the pipe has full support from end to end. A trench that dips, narrows, or widens at random creates soft spots where pipe can settle later. Settlement is not just an installation problem. It becomes a maintenance problem a year or two later when sediment collects in the low spots and flow slows down.
If you use a trencher, plan on hand-cleaning the bottom. Trenchers save time on excavation, but they do not leave a finished grade. Roots, loose dirt, and high spots still need to be cut out by hand.
Keep spoil on one side and gravel on the other. Once dirt gets mixed into your drainage stone, you are building in future clogs.
Set and check grade before anything goes in
The yard surface can fool you. The trench bottom is what matters.
Use string, stakes, and a level, or a rotary laser if you have one. Check the bottom often, especially on longer runs or any layout with turns. A French drain does not need a dramatic drop, but it does need steady fall toward the outlet. One flat section can hold water and start the slow buildup of fines inside the system.
I tell homeowners this all the time. If you are tired enough to start eyeballing grade, you are tired enough to make an expensive mistake.
A trench can look clean from above and still fail underground if the bottom has a belly or a flat spot.
Line the trench so soil stays out of the stone
Once the trench is shaped and cleaned, line it with filter fabric across the bottom and up both sides. Leave enough extra at the top to fold over the stone later.
Do not stretch the fabric tight like a drum. Let it follow the trench shape so it does not tear when stone goes in. Overlap seams enough that soil cannot slip through gaps. Pay attention around roots, rocks, and corners, because those are the spots where fabric gets cut and the drain starts taking in silt.
This part matters for the life of the system. A drain that fills with sediment from the surrounding soil may still work for a while, but it loses capacity year by year.
Add the base stone and place the pipe carefully
Lay a bed of clean gravel in the bottom before the pipe goes in. That base gives the pipe support and creates open space for water to collect.
Set the perforated pipe on the stone with the holes facing down. That surprises some people, but it is the standard setup for most yard drains because water rises into the pipe through the gravel bed while the pipe stays supported along its length.
Use enough fittings to keep the layout true, but do not create a maze of unnecessary turns. Every extra bend is a future inspection and cleaning headache. On systems with a catch basin, make sure the connection is square and fully seated so sediment does not hang up at the joint.
If you want to avoid the installation errors I see most often, this guide on building a french drain without common mistakes covers the trouble spots well.
Surround the pipe with stone and close the fabric
Cover the pipe with clean gravel on the sides first, then over the top. Do not dump heavy loads in one spot and crush the alignment you just worked to set. Spread the stone evenly and keep checking that the pipe has not rolled or lifted.
Once the stone envelope is in place, fold the excess fabric over the top. The goal is simple. Keep the drainage path open and keep surrounding soil out of it for as long as possible.
After that, finish the top with the surface material your yard calls for. Some drains get topsoil and sod. Others get decorative rock. The right finish depends on how visible you want the drain to be and how easy you want future access to remain.
Use a field checklist before you backfill
Before you close the trench, stop and inspect the work.
- Confirm the outlet direction and flow path before the pipe disappears under stone.
- Check the trench bottom and pipe for low spots that can trap water and sediment.
- Make sure the gravel is clean and has not been contaminated with loose soil.
- Verify fabric coverage so the stone envelope can be wrapped without open gaps.
- Look at every connection point for misalignment, loose fittings, or places where debris can catch.
A French drain is buried, but it is not a bury-and-forget system. The way you dig and install it determines how often you will be troubleshooting clogs, settlement, and poor flow later. That is the part many DIY guides skip, and it is why careful installation usually saves more money than rushing the trench ever will.
Choosing an Outlet and Finishing the Job
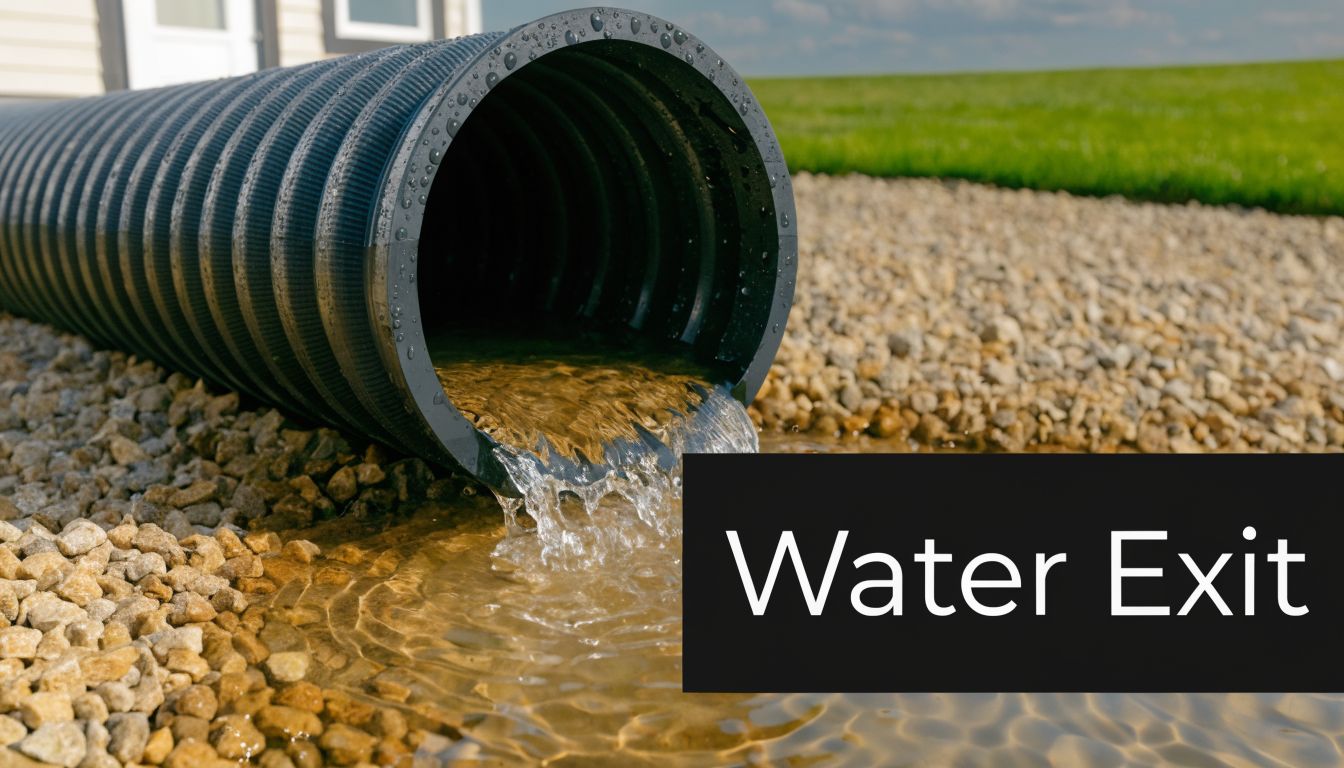
A French drain is only as good as where it sends the water. You can install the trench perfectly and still end up with a wet yard if the outlet is poorly chosen, blocked too easily, or placed where discharged water circles back toward the house.
Comparing common outlet options
The right outlet depends on your lot, elevation, local runoff patterns, and how visible you want the discharge point to be.
| Outlet Type | Good fit for | Watch out for |
|---|---|---|
| Daylight outlet | Sloped yards where water can exit naturally downhill | Discharge must not erode soil or dump water into a problem area |
| Pop-up emitter | Lawns where you want a cleaner look and hidden discharge point | Can clog with debris or stick if neglected |
| Dry well | Properties where water can disperse below grade and surface discharge isn't practical | Needs the right site conditions and thoughtful design |
A daylight outlet is the most straightforward when the property gives you natural fall. Water exits visibly, and it stays easy to inspect. The trade-off is appearance and erosion control. If water leaves with force, the outlet area needs protection.
A pop-up emitter keeps things neater in finished turf areas. Homeowners like the cleaner look. The downside is simple. If that emitter gets blocked with debris, sediment, or overgrown turf, the system can back up.
Dry wells have their place, but they're not a cure-all. If the surrounding soil doesn't accept water well, you're just relocating the storage problem underground.
Pick an outlet that you can inspect after a hard rain without guessing where the water went.
Finish the trench so it doesn't announce itself
Once the drain body is wrapped and the outlet connection is complete, backfill the upper portion of the trench with saved soil or clean topsoil. Don't leave loose mounded soil and assume rain will settle it nicely. It usually settles unevenly and leaves a dip you notice every time you mow.
For lawn restoration, try to match the finish to the surrounding grade as closely as possible. Some homeowners seed the repaired strip. Others prefer sod for a faster visual recovery. If you're using decorative aggregate near the top layer instead of turf, details like stone choice affect both appearance and drainage performance. If that's your plan, this guide to how to install a french drain using river rock can help you think through the finish.
Test before you call it done
Before final landscaping covers everything up, run water through the system with a garden hose. A proper test is simple. Water should move freely through the inlet area and make its way to the outlet without backing up.
That test matters because it's easier to fix a connection, a low spot, or an outlet issue before the lawn is restored. If the flow looks weak, don't talk yourself into believing real storms will somehow make it better. They won't.
Walk the entire line during the test and watch for warning signs:
- Water standing at the inlet
- Slow movement through the run
- Leaking or seepage at a fitting
- No visible discharge at the outlet when water is clearly entering the system
A finished French drain should look natural in the yard and behave predictably in the rain. If either part is off, it usually points back to installation details that need attention before the project is finished.
Long-Term French Drain Maintenance and Troubleshooting
Most install guides stop once the trench is covered. That's where real ownership starts.
In West Tennessee, a drain can work well for years and then start underperforming because the grate stays buried in leaves, the outlet gets choked with growth, or sediment slowly builds up where no one checks. Many DIY resources don't give homeowners a maintenance calendar, even though areas with heavy rainfall need one. That gap is exactly why long-term inspection, sediment checks, warning signs, and timely professional cleaning matter, as noted in this discussion of French drain maintenance needs.
A simple maintenance routine that makes sense
You don't need to obsess over the system. You do need to look at it on purpose.
Use a practical routine like this:
- After major rains check whether water exits where it should and whether any area above the drain line is staying unusually wet
- During leaf season keep inlet grates and visible discharge points clear of debris
- When mowing and edging avoid burying emitters, grates, or outlet guards under soil and grass buildup
- At least seasonally walk the line and look for settling, soft spots, or surface water reappearing over the trench
If you want a more detailed owner-focused checklist, this guide on French drain maintenance is a practical follow-up.
Warning signs the system is starting to fail
French drains rarely fail all at once. They usually give signals first.
Watch for these problems:
| Sign | What it may mean |
|---|---|
| Water pools above the drain path | The pipe may be blocked, crushed, or not discharging well |
| The inlet drains slowly | Sediment or debris may be restricting flow |
| The outlet stays dry when the area is saturated | Water may not be reaching the discharge end |
| One section of lawn stays soft | The trench may have settled, or water may be escaping before the outlet |
If the drain worked before and suddenly doesn't, don't assume the weather changed. Something in the system usually has.
What you can handle and when to bring in help
Basic cleanup is a homeowner job. Clear the grate. Keep the outlet open. Watch for visible settlement. Those are all manageable.
What usually calls for professional service is diagnosing buried problems. Sediment buildup, root intrusion, damaged pipe, or a hidden low spot can be hard to confirm without the right tools and experience. If the system repeatedly underperforms after storms, that's the point to stop guessing and have it inspected.
A French drain isn't a bury-it-and-forget-it system. It's low maintenance, not no maintenance. Homeowners who treat it that way usually get much more dependable service out of the installation.
When to DIY vs When to Call a Pro Like Lawn & Leaf Solutions
A lot of French drains go wrong after the trench is already closed. The yard looks cleaned up, the gravel is in, and the first hard rain shows the problem was never solved. That is usually a grade issue, a bad outlet, or a layout that ignored how the water moves across the property.
A homeowner can install a French drain. The more important question is whether you can build it with enough accuracy that it still works a year from now, not just the week after installation. That includes slope, pipe protection, discharge, surface restoration, and access for future cleanup if the line starts slowing down.
DIY makes sense on simple jobs
DIY is a reasonable route when the job is small, the drainage path is obvious, and failure will not put the house, crawlspace, or driveway at risk.
You are usually in good shape to handle it yourself if:
- The run is short and direct with a clear discharge point
- The yard gives you room to work without cutting through major roots, irrigation, fencing, or hardscape
- You can establish and hold grade with string line, level, or laser, not guesswork
- The trench stays away from the foundation and other areas where a mistake gets expensive fast
- You are prepared for upkeep later such as clearing the outlet, checking for settlement, and watching performance after storms
That last point gets skipped in a lot of DIY guides. A French drain is a system you install, monitor, and maintain. If you are not willing to inspect it after major rain and deal with small problems before they grow, the savings from doing it yourself can disappear.
Call a pro when water is affecting the house or the layout is tricky
Professional help makes sense when the water problem is tied to the foundation, the crawlspace, retaining walls, or a yard with inconsistent slope. It also makes sense when there is no obvious outlet, when the trench has to cross utility-heavy areas, or when the property needs more than one correction at the same time.
If basement or crawlspace water is part of the problem, this overview on preventing basement flooding with sump pumps gives useful context on when underground drainage and pumping systems need to work together.
I also tell homeowners to slow down and get help when they are dealing with any of these conditions:
- Standing water near the house
- A yard that needs regrading, not just a trench
- Heavy clay soil that drains poorly even with pipe in the ground
- A discharge point that may back up during storms
- Recurring failures from an older drain that never performed right
Those are the jobs where experience matters. In West Tennessee, a drain can look fine during light weather and then fail as soon as a hard rain loads the trench with more water than the outlet can carry.
What professional installation changes over the life of the system
A good contractor does more than dig faster. The value is in diagnosing the water source correctly, setting the drain at the right elevation, protecting the pipe from crushing and sediment entry, and leaving you with a system that can be serviced later.
That lifecycle view matters. A drain that works only when it is brand new was not installed well enough.
For homeowners in Jackson and the surrounding area, Lawn & Leaf Solutions handles drainage evaluation, French drain installation, and ongoing yard water-management work under Tennessee license TNPL23317. That matters when the property needs grading, discharge planning, correction of a failed older system, or a maintenance plan after installation.
The least expensive job is often the one that does not have to be reopened. If you are unsure about the outlet, the slope, soil conditions, or whether a French drain is even the right fix, getting a professional assessment first is often the smarter call.